Deploy a Full-Stack Node.js Application on Azure VM with Private MySQL

Deploying a full stack application to the cloud is more than creating a virtual machine and running npm start.
You need to think about network segmentation, private database connectivity, security groups, reverse proxies, process management, DNS, application configuration, and troubleshooting.
In this tutorial, we'll deploy EpicBook, a Node.js/Express application backed by MySQL, on Microsoft Azure.
The final architecture will use:
An Azure Virtual Network (VNet) with separate public and private subnets
An Ubuntu 22.04 LTS Azure VM
Nginx as a reverse proxy
Node.js/Express running the EpicBook application
Azure Database for MySQL Flexible Server using private VNet access
Network Security Groups (NSGs) to control traffic
PM2 to keep the application running
MySQL seed files to populate application data
The important lesson is that moving an application to Azure doesn't eliminate troubleshooting, it introduces new infrastructure layers that you need to understand.
What We Are Building
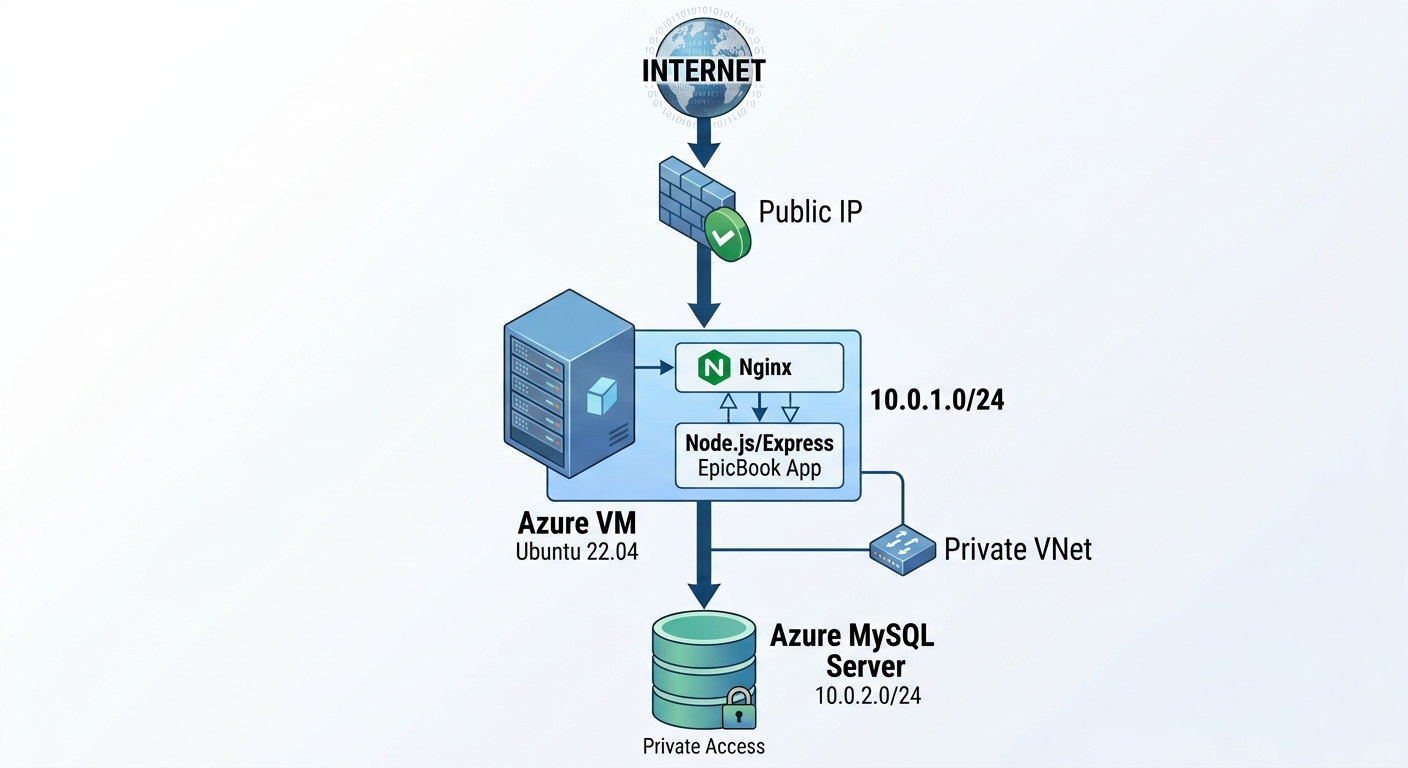
The target architecture looks like this:
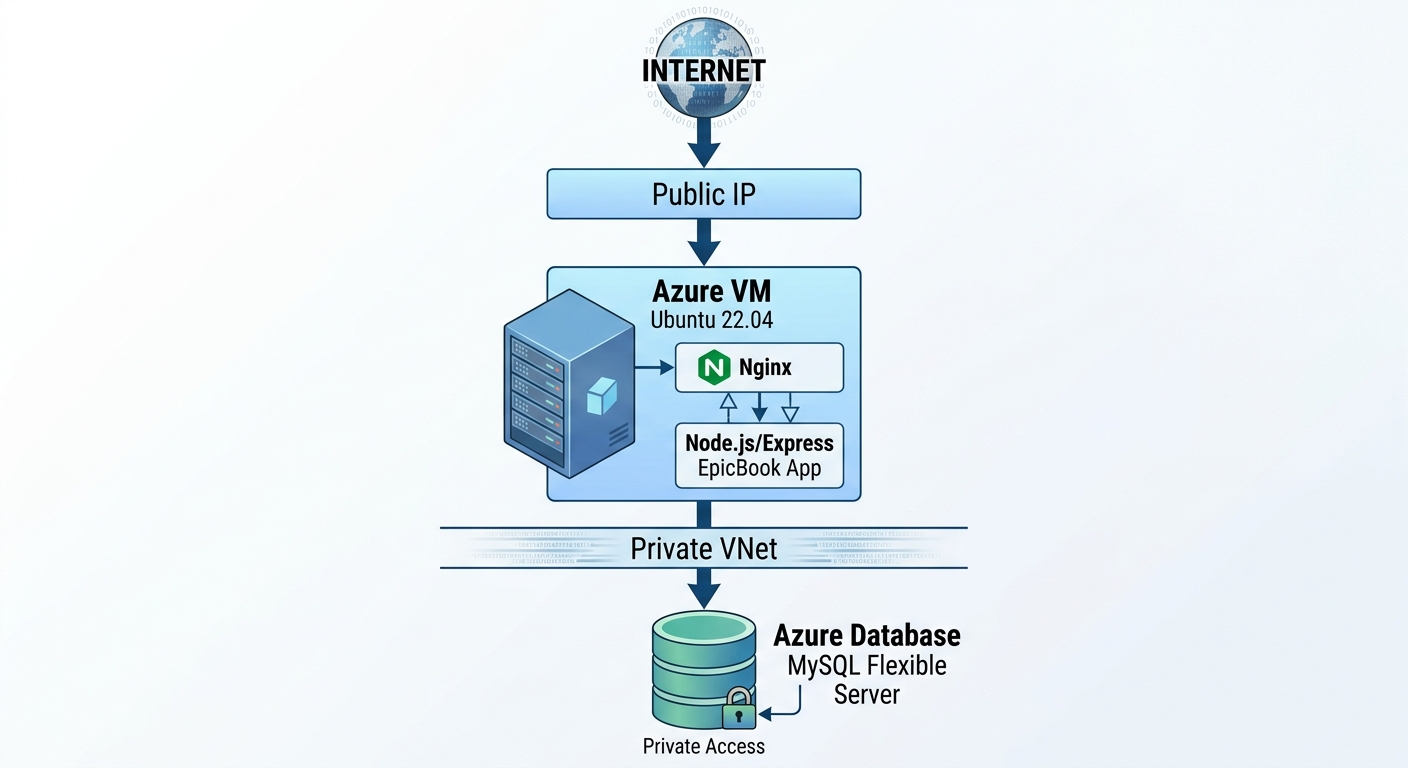
The Virtual Network will use the following address space:
| Resource | CIDR |
|---|---|
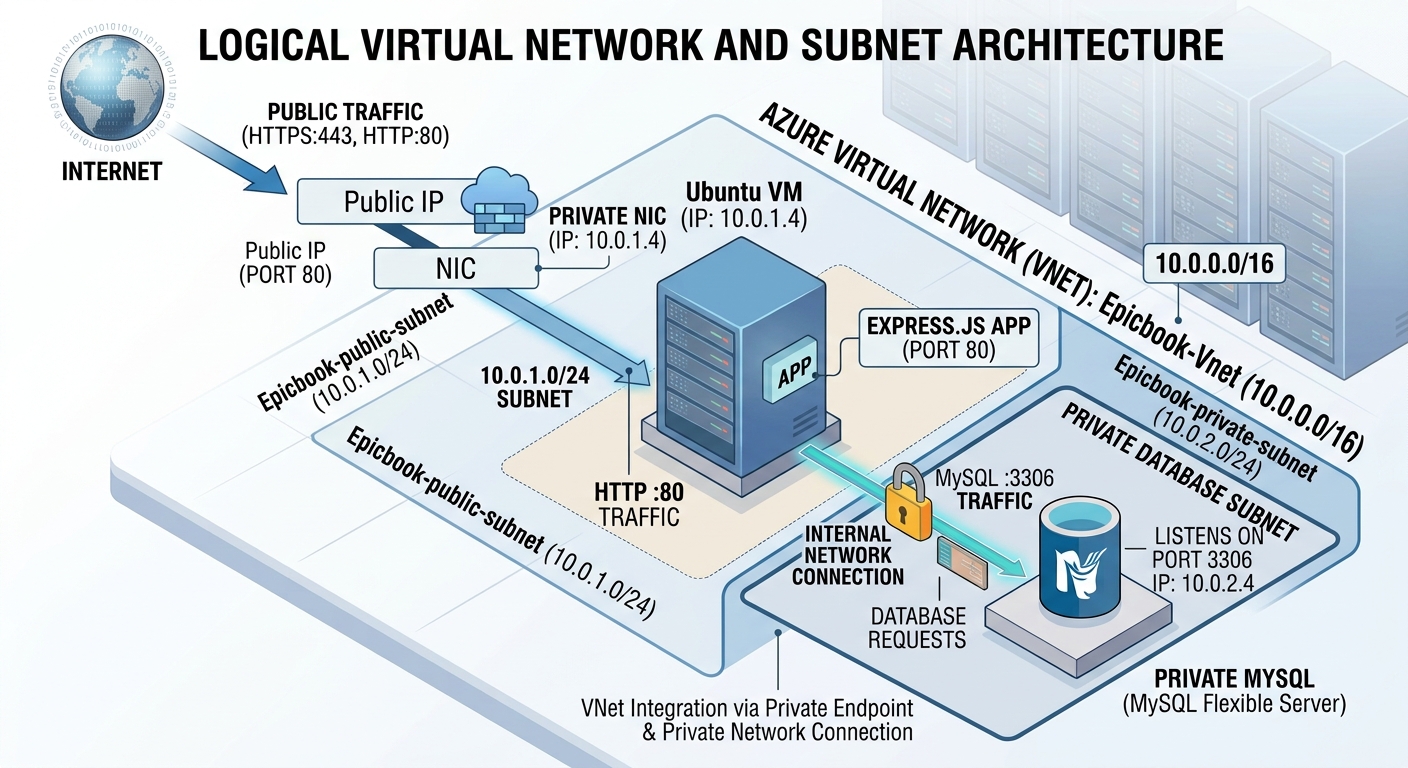
| VNet | 10.0.0.0/16 |
| Public/VM subnet | 10.0.1.0/24 |
| Private/MySQL subnet | 10.0.2.0/24 |
The VM is the only public entry point.
The database is not exposed directly to the internet.
Azure Database for MySQL Flexible Server's VNet integration requires a delegated subnet dedicated to MySQL Flexible Server. Azure also uses a Private DNS zone for name resolution when private access is configured through the portal.
Prerequisites
Before starting, you should have:
An active Azure subscription
An SSH client
Basic Linux command-line knowledge
Basic Git knowledge
Familiarity with Node.js and npm
Basic understanding of networking
The EpicBook repository
Phase 1 - Understand the EpicBook Application
Before creating infrastructure, it is important to understand what is actually being deployed.
EpicBook consists of:
Node.js
Express.js
Express Handlebars
Sequelize
MySQL
Nginx
PM2
Task 0 - Create the Azure Resource Group
A resource group provides a logical container for the Azure resources belonging to the application.
Sign in to the Azure Portal and search for Resource groups.
Select Create.
Configure:
1. Select your Azure subscription from the drop down
2. Enter your preferred name for the Resource Group
3. Select a preferred Region to house the project
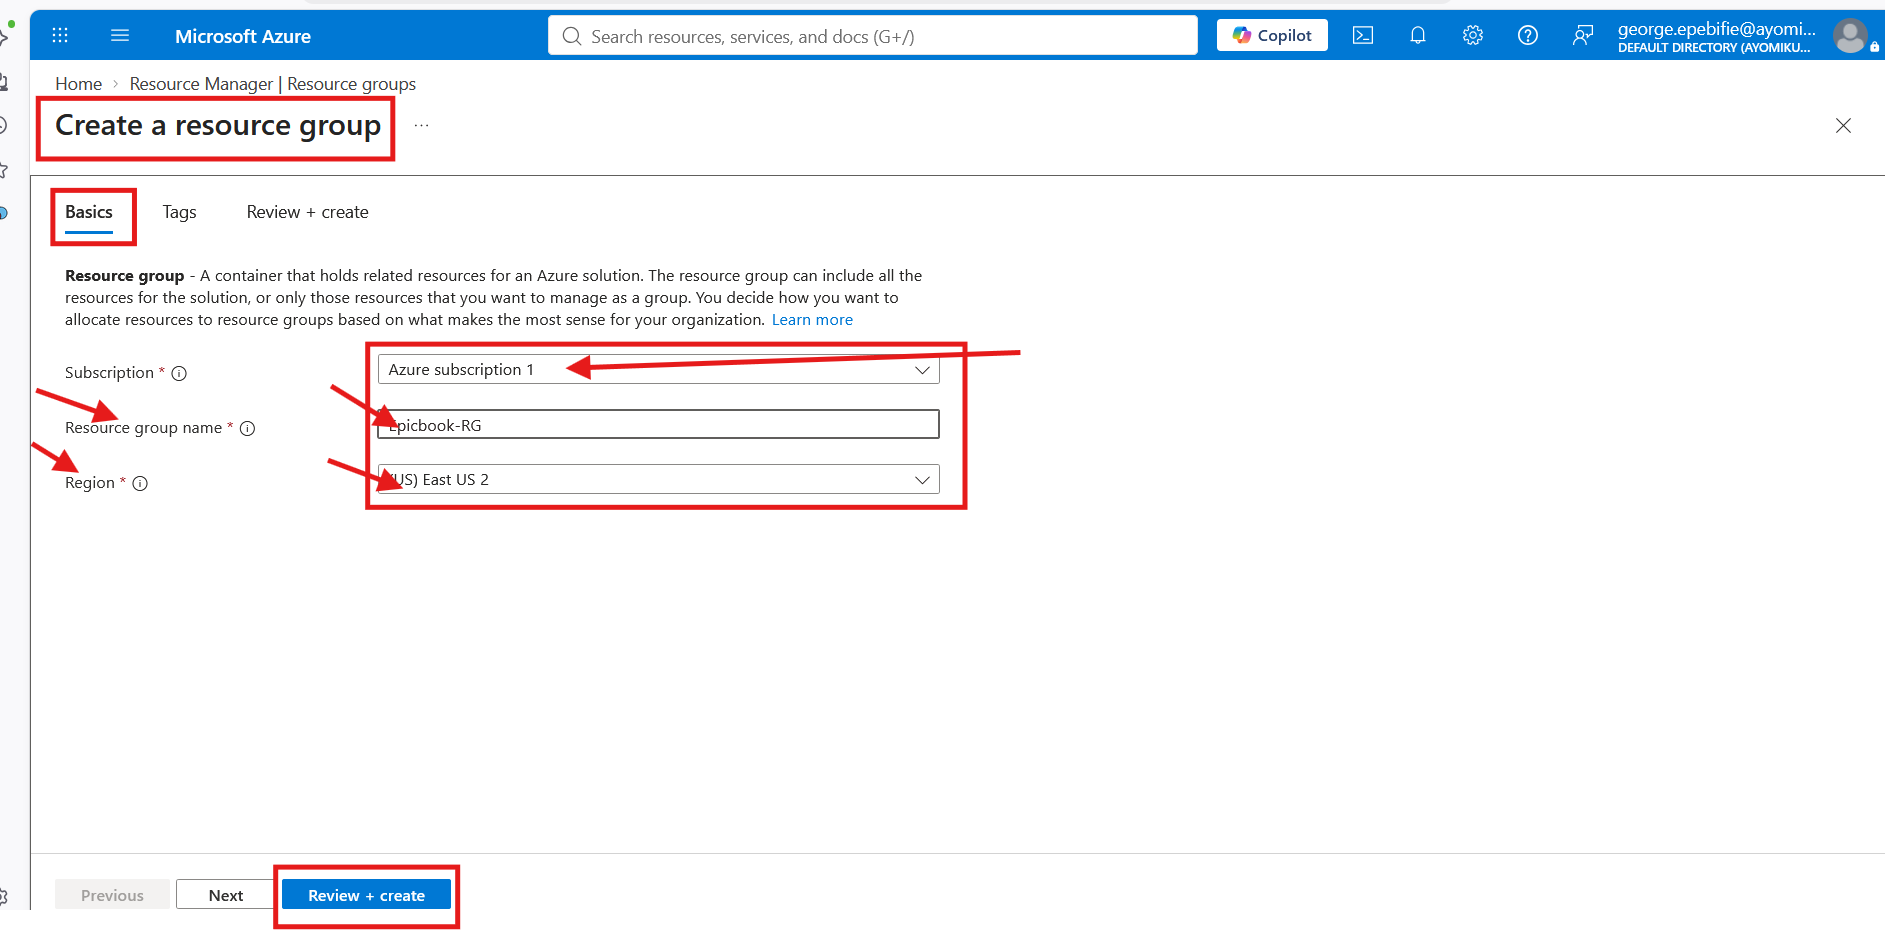
Select Review + create, allow for the configuration to be validated , then select Create.
You should now have:
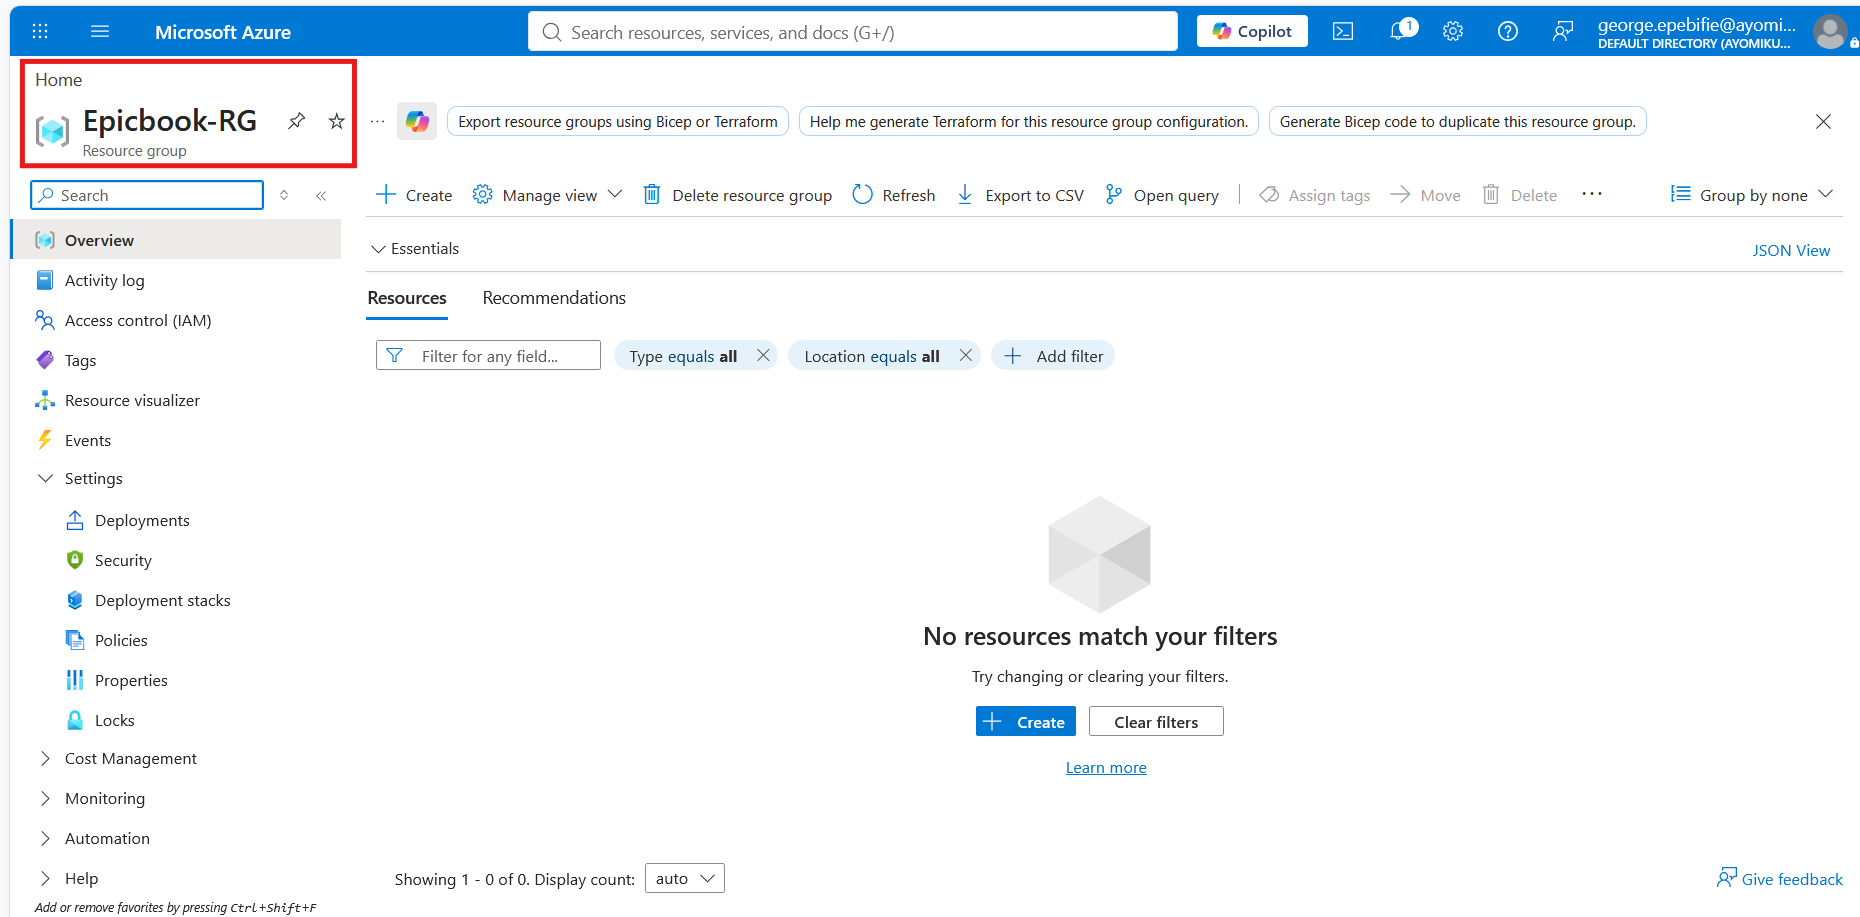
This resource group will contain the major resources used throughout the deployment.
Task 1 - Build the Azure Network
The network is one of the most important parts of this architecture.
We will create:
One Virtual Network
One public subnet for the VM
One private subnet for MySQL
One NSG for the public subnet
One NSG for the private subnet
One public IP address for the VM
Step 1.1: - Create the Virtual Network
In the Azure Portal, search for Virtual networks.
Select Create.
On the Basics tab enter the following details
Your Azure subscription, Resource Group Name, Virtual Network Name, Select the region you created the resource group in;
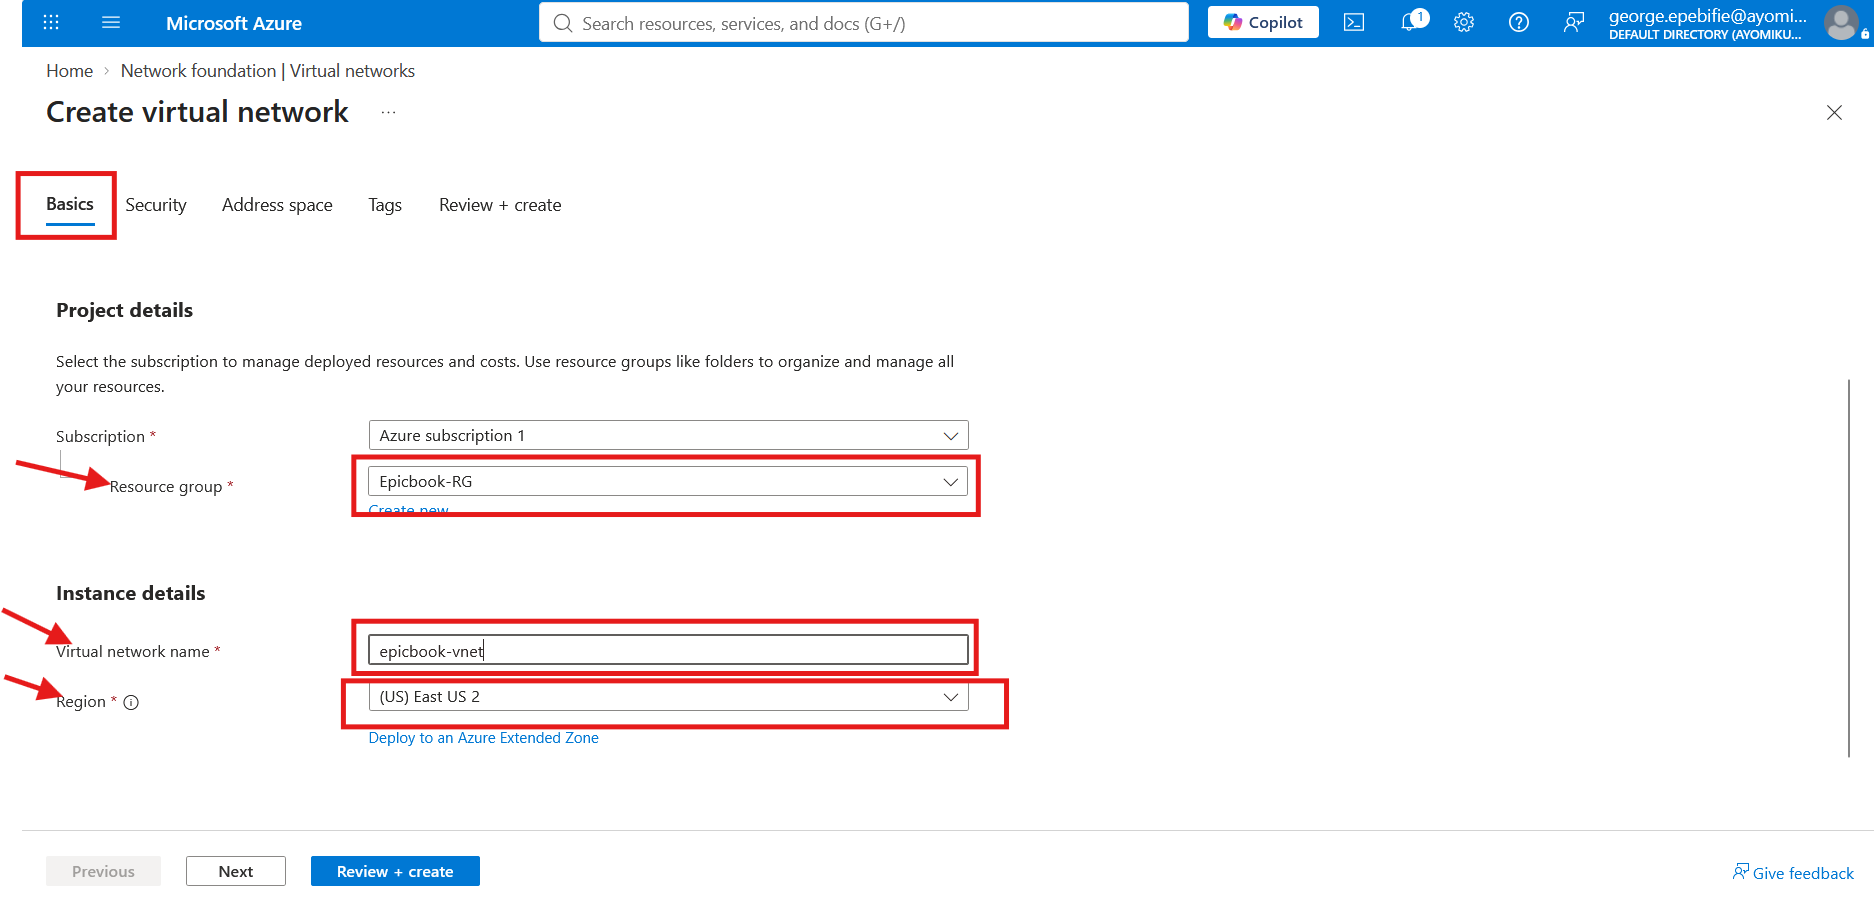
next we will add /16 address space provides a large private address range from which Azure subnets can be allocated.
Step 1.2: Create the Public Subnet
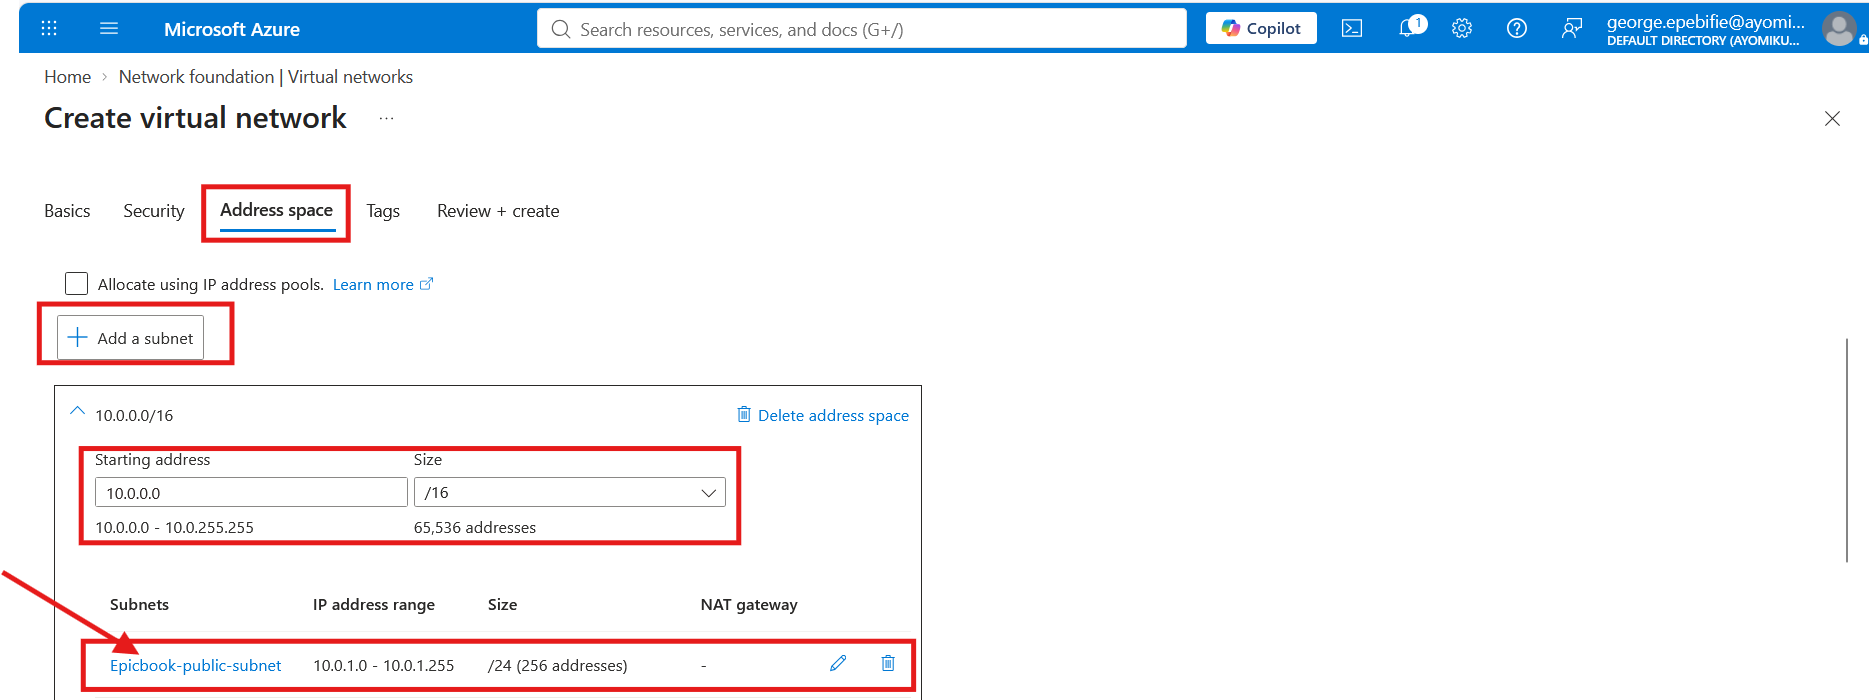
on the Address Space tab click on Add a subnet and enter the following details for the public subnet; subnet name: epicbook-public-subnet and address range : 10.0.1.0/24.
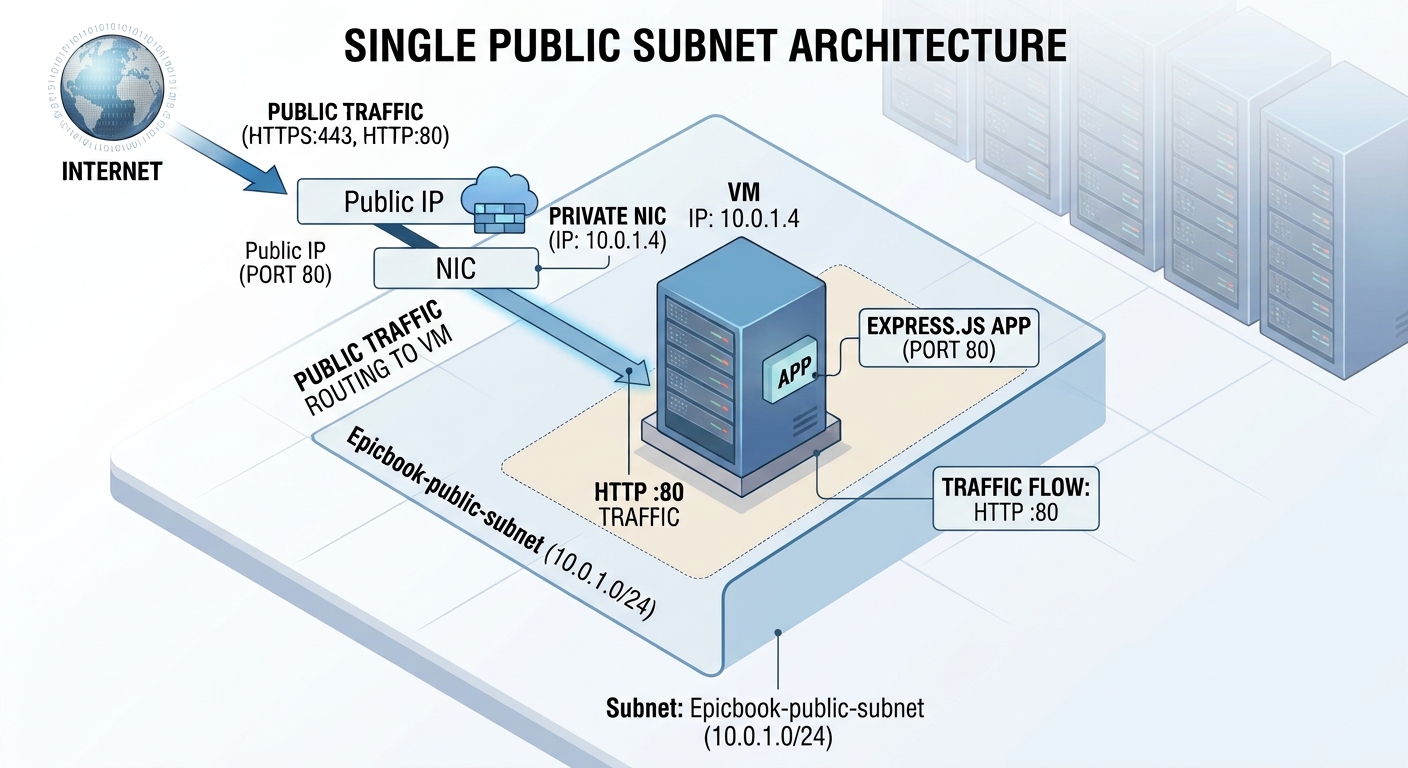
This subnet will contain the VM.
The resulting structure is:
Step 1.3: Create the Private Subnet
Create another subnet with the following details subnet name: Epicbook-private-subnet and address range: 10.0.2.0/24
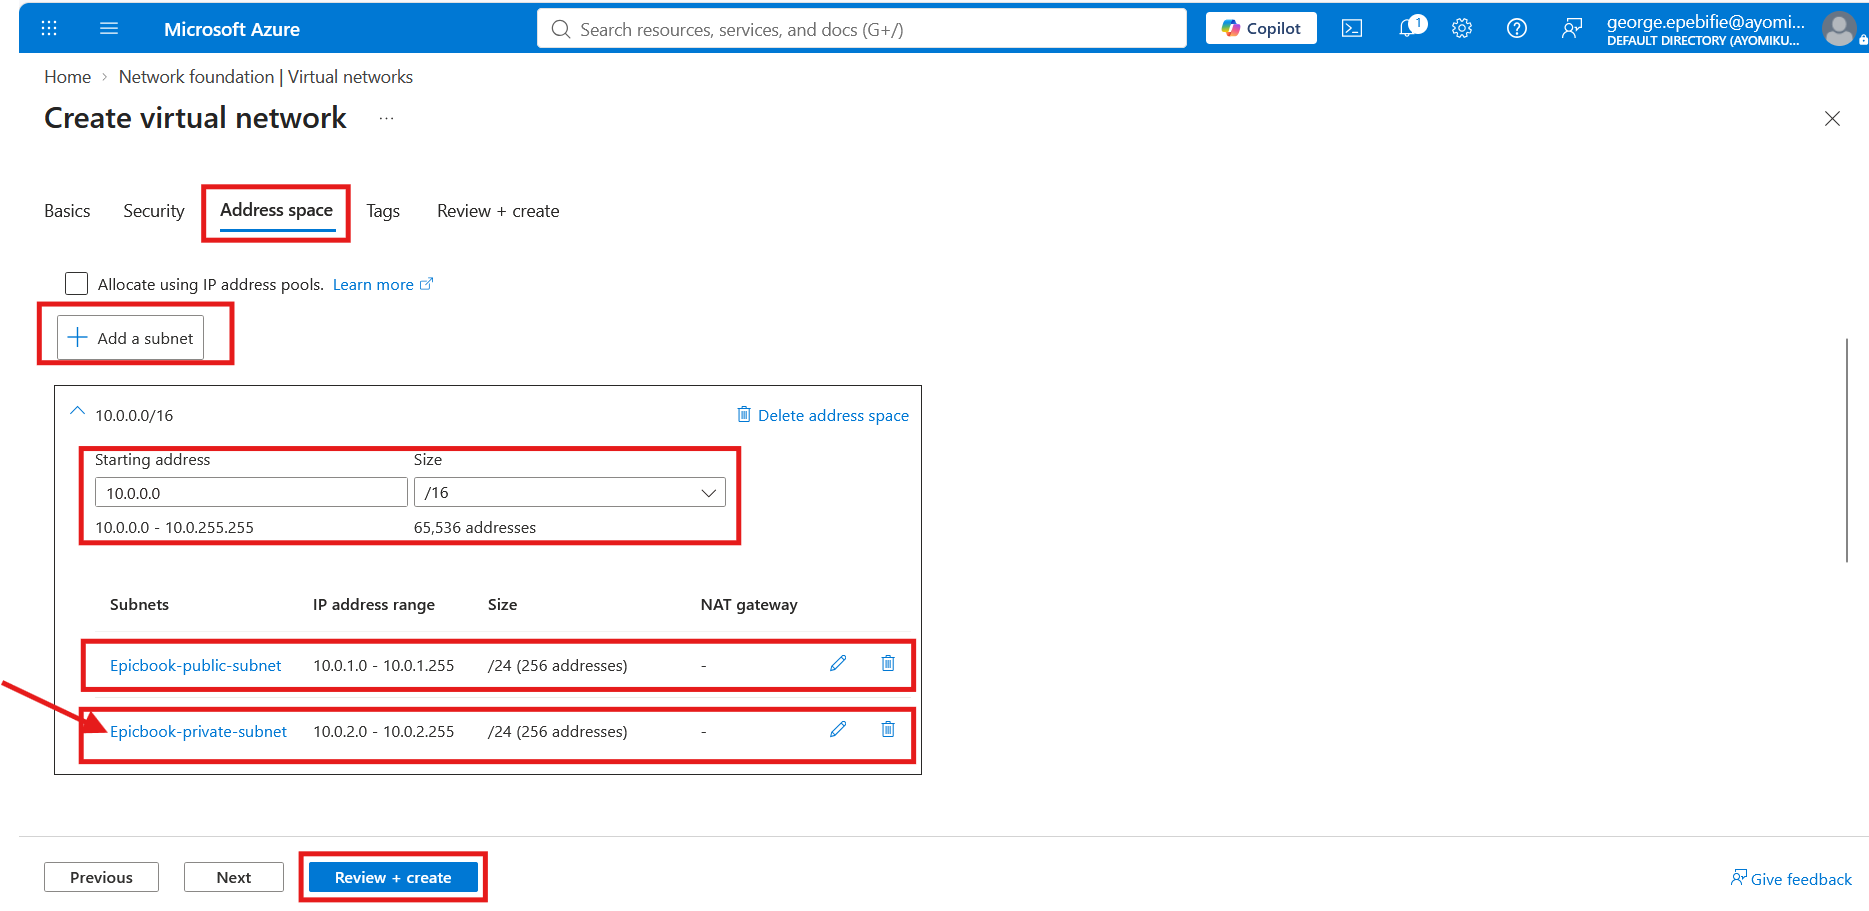
This subnet is intended for Azure Database for MySQL Flexible Server.
The Virtual Network now looks like:
Step 1.4: Create the Public Network Security Group
Search for Network security groups in Azure Portal.
Select Create.
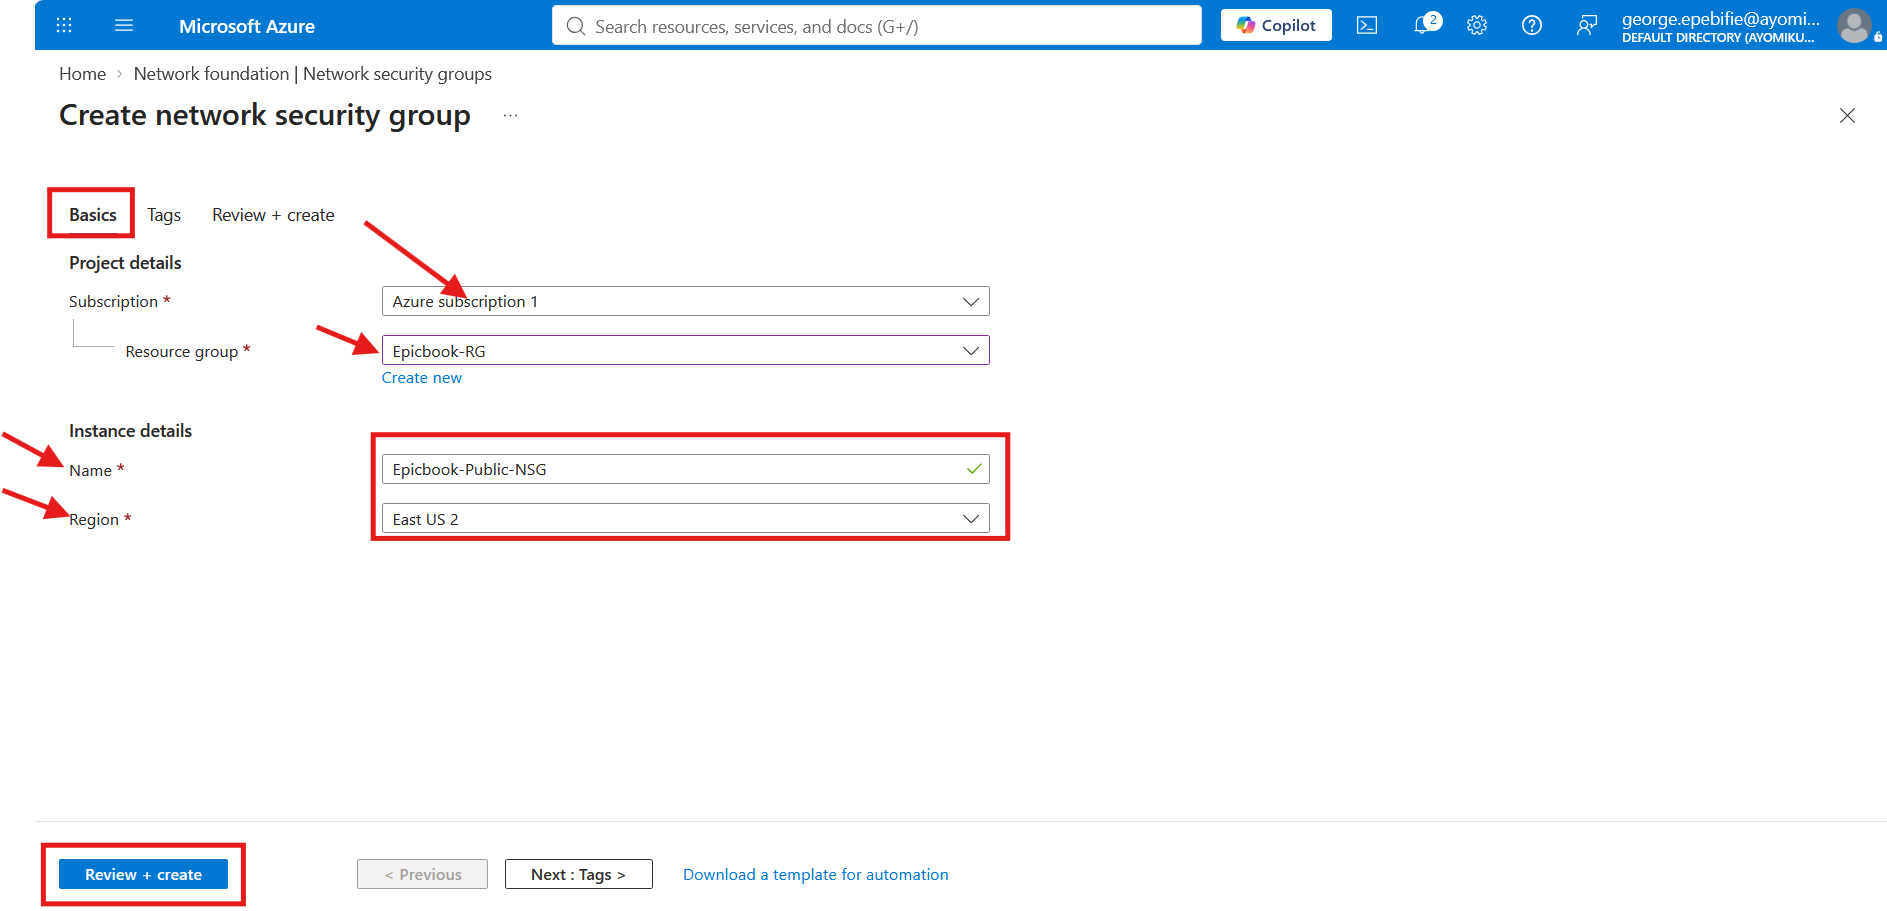
in the page that shows enter the following details; Your subscription[e.g. Azure Subscription 1] , Resource Group[e.g. Epicbook-RG], Network Security Group Name[e.g. Epicbook-public-NSG], same Azure region we've used all the while.
click Review + create, wait for validation then click Create to create the Network Security Group.
Step 1.5: Configure Public NSG Rules
The VM needs to receive HTTP traffic from the Internet.
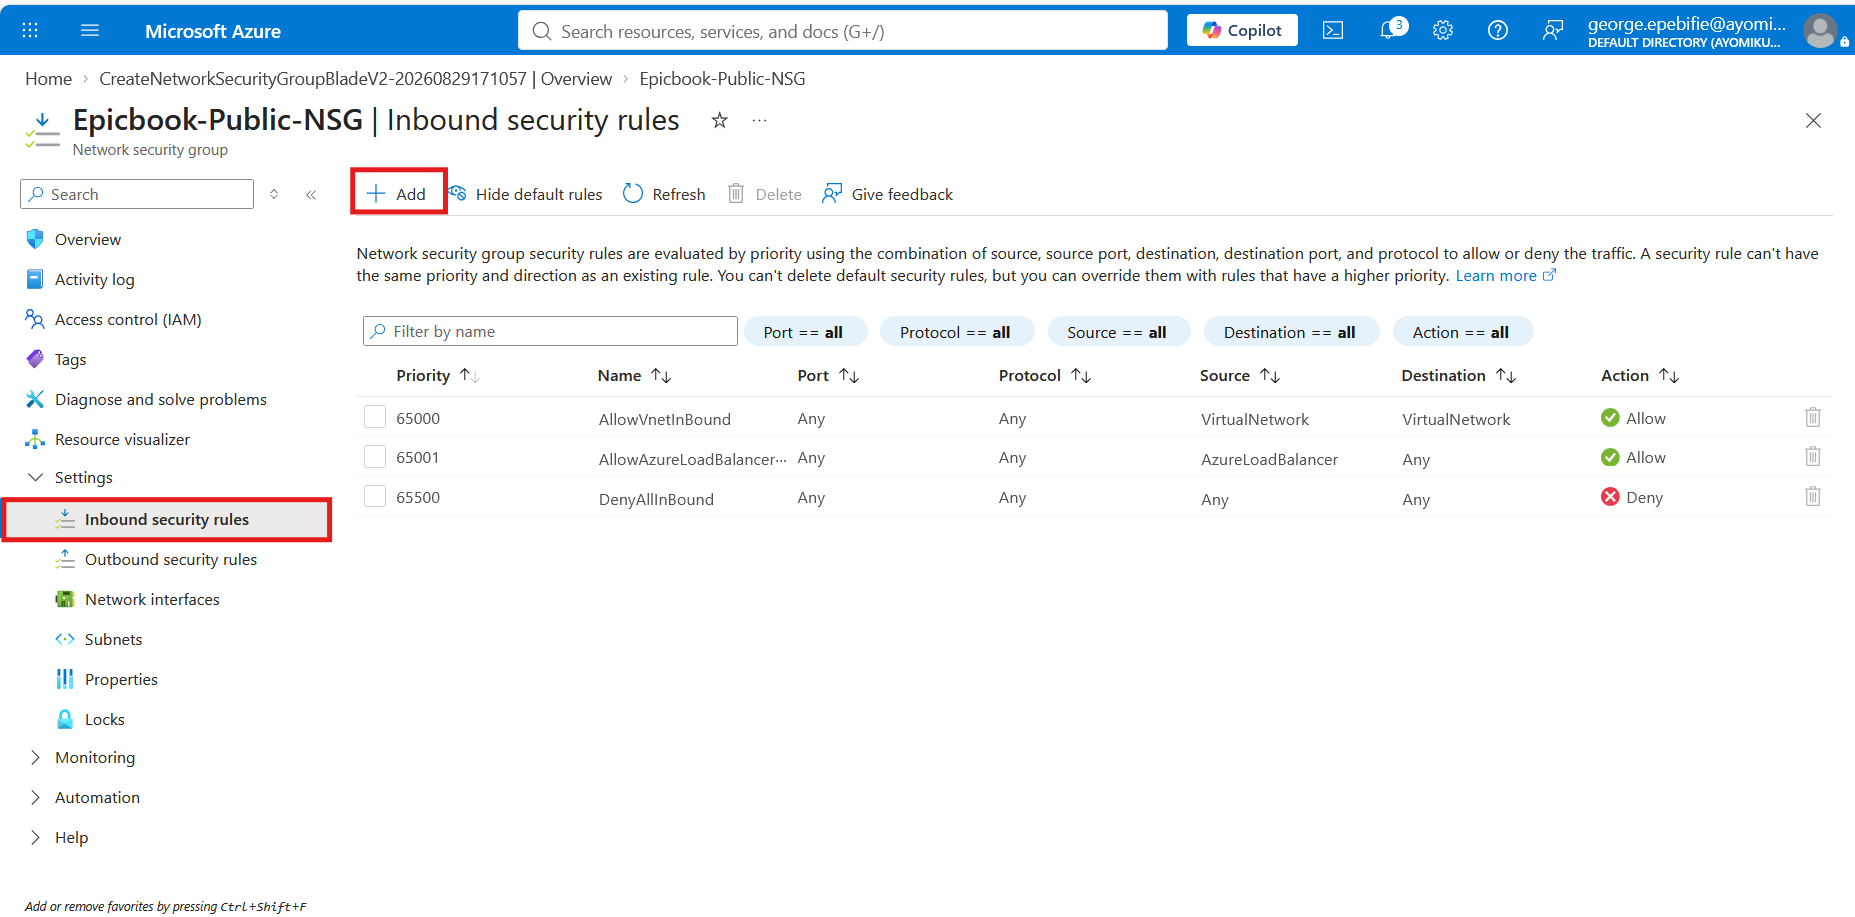
It also needs SSH access for administration. so we need to set some incoming and outgoing rules for the NSG, to set the rules, open the public NSG page. click on the inbound security rules tab on the left pane and then click on +Add at the top of the screen to reveal a pop up screen where you can enter the rules.
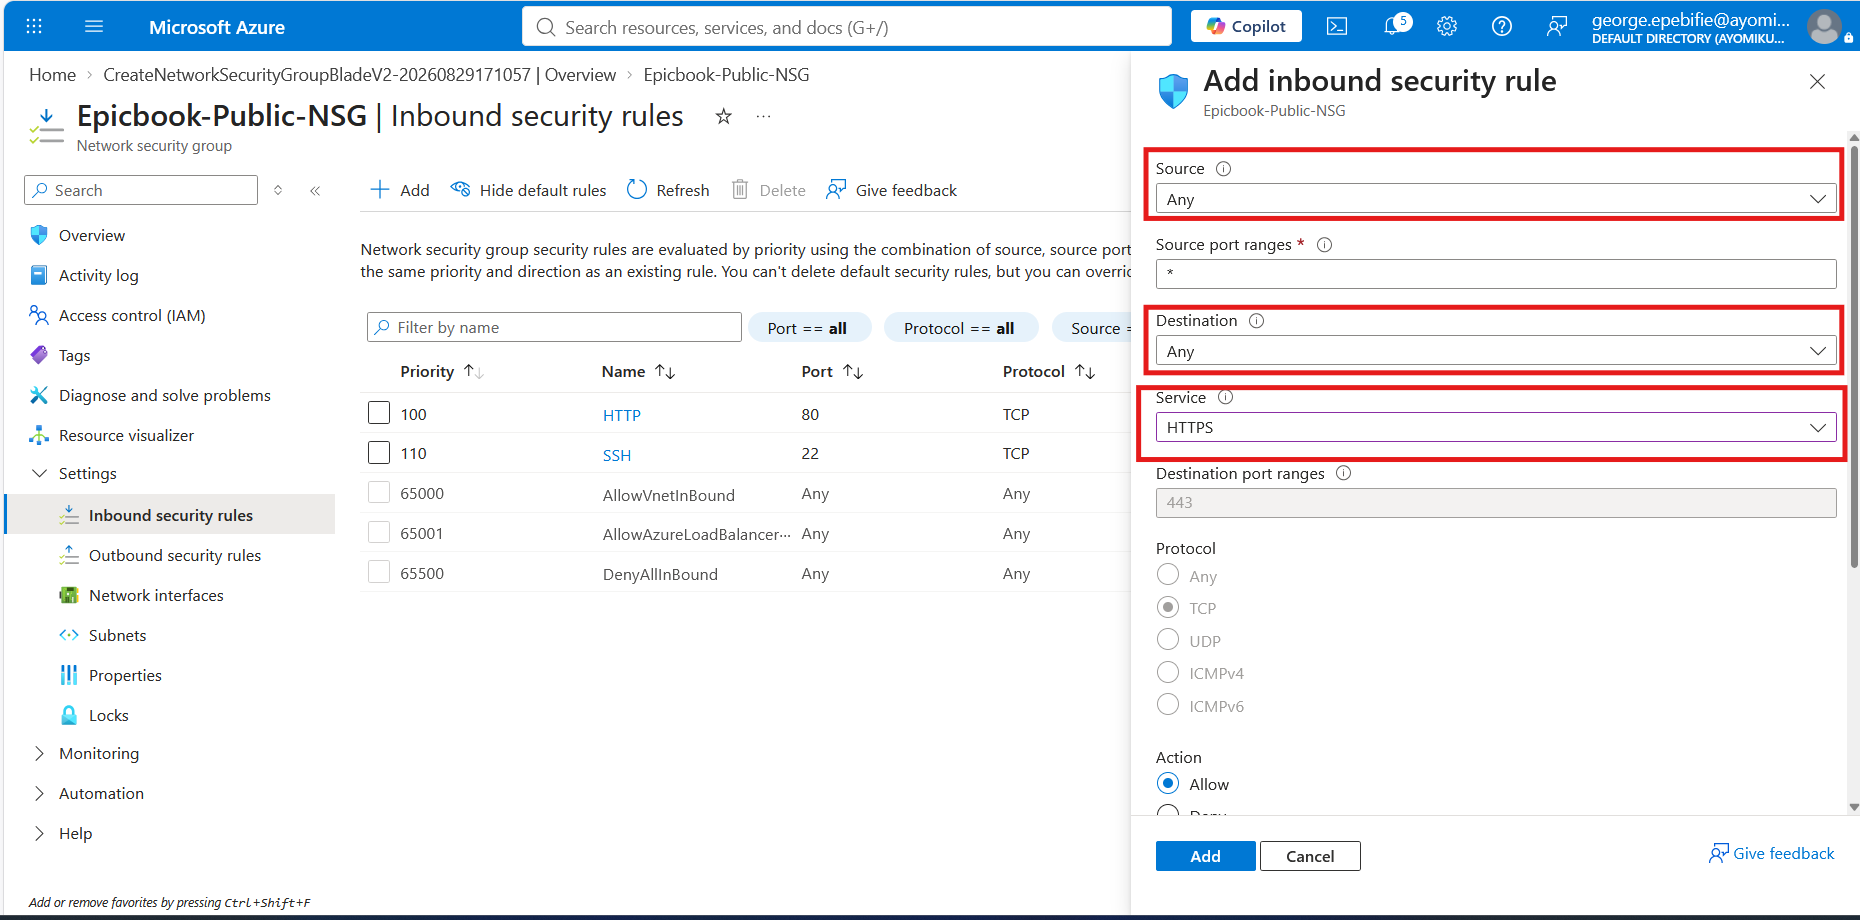
HTTP rules will be set as follows: Source: any, Source port: *, Destination: any, Service: Http, Destination port: 80, Protocol : TCP, Action: Allow, Priority: 110, Name: Allow-http
HTTPS rules will be set as follows: Source: any, Source port: *, Destination: any, Service: Https, Destination port: 443, Protocol : TCP, Action: Allow, Priority: 120, Name: Allow-https
For SSH, use a much narrower source whenever possible.
For example: Source: My IP address, Service: SSH, Destination port: 22, Protocol: TCP, Action: Allow, Priority: 100, Name: Allow-ssh
Security recommendation
Do not unnecessarily expose SSH to the entire Internet.
Instead of:
0.0.0.0/0 → TCP/22
prefer:
Your trusted IP → TCP/22
If your public IP changes frequently, you may need to update the NSG rule.
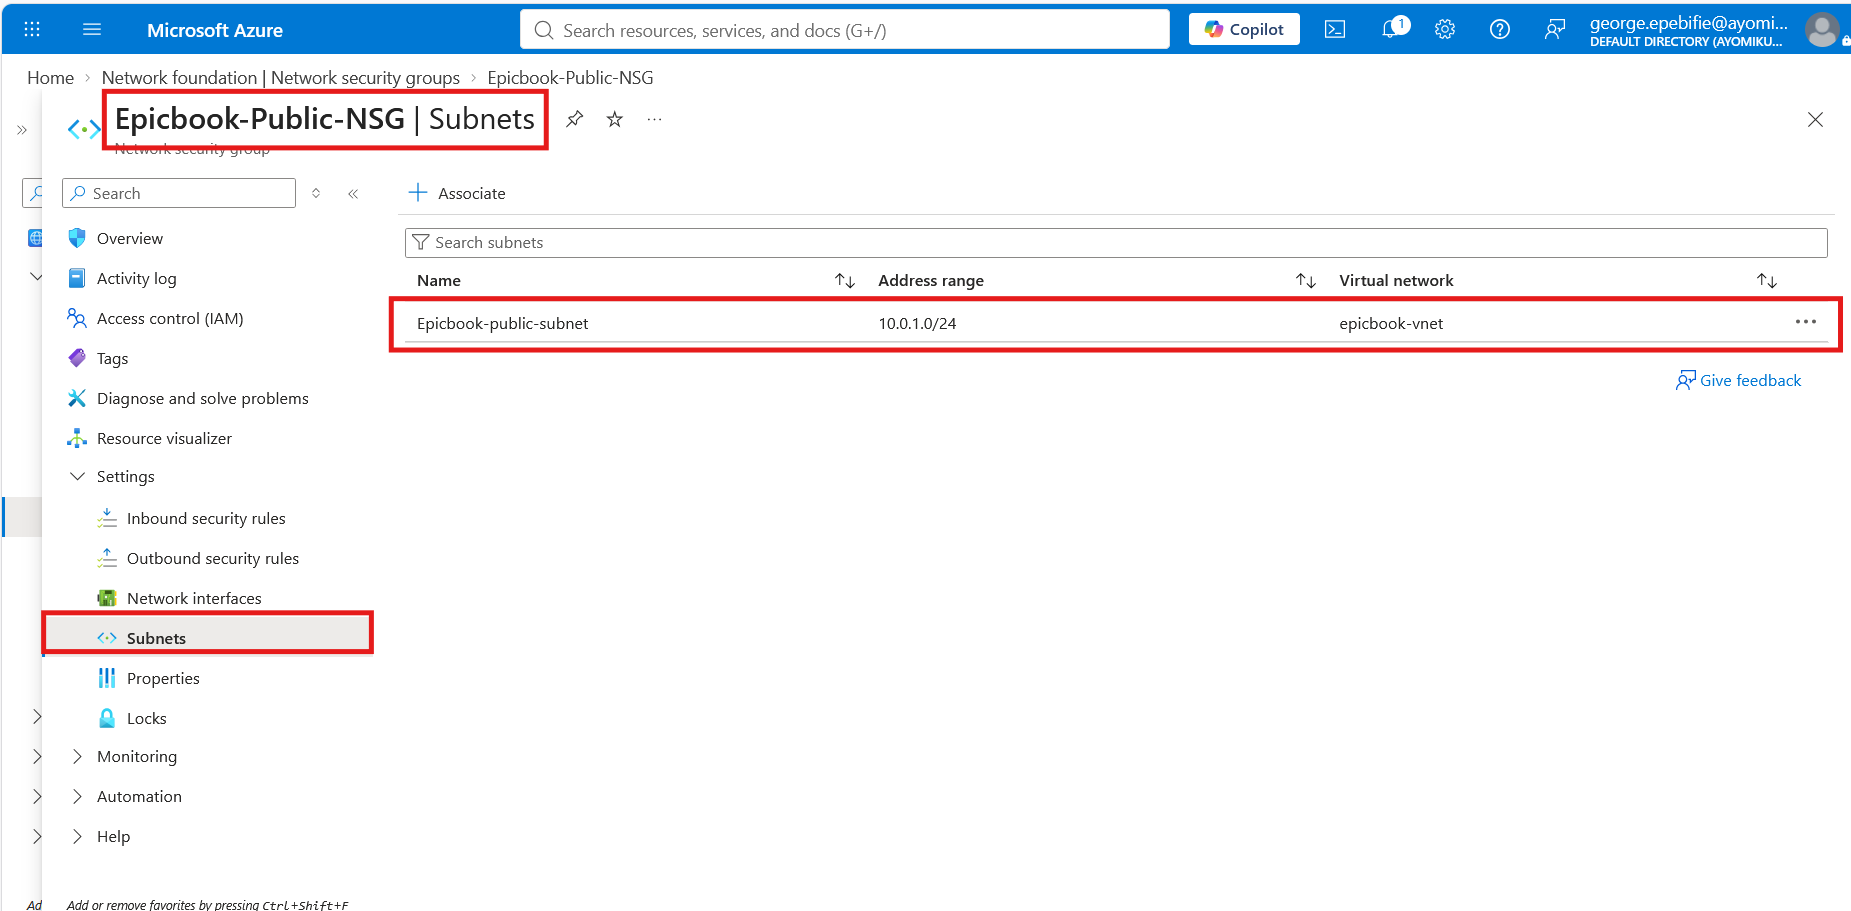
Step 1.6: Associate the Public NSG with the Subnet
Open:
Epicbook-Public-NSG → Subnets
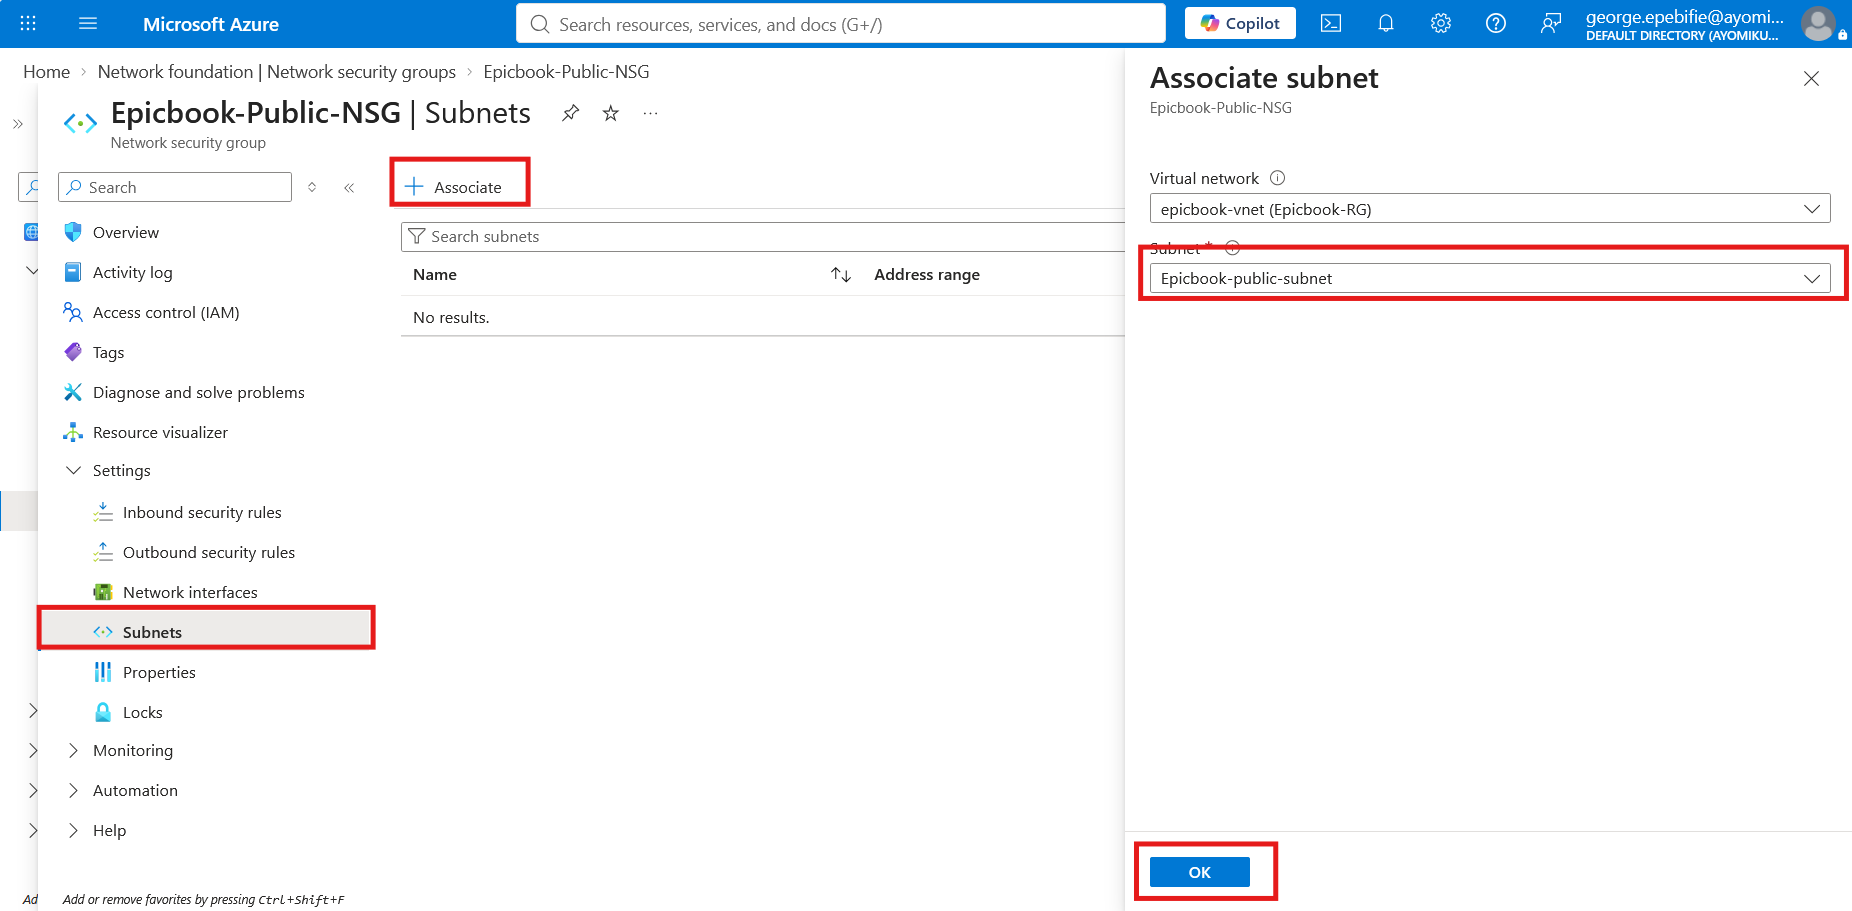
Select Associate.
Choose:
Virtual network:
Epicbook-VnetSubnet:
Epicbook-public-subnet
The public subnet now has the NSG applied to it.
Step 1.7: Create the Private Network Security Group
Create another NSG with the following details; Resource Group: Epicbook-RG, Name: Epicbook-private-NSG, Region: Same as the public NSG.
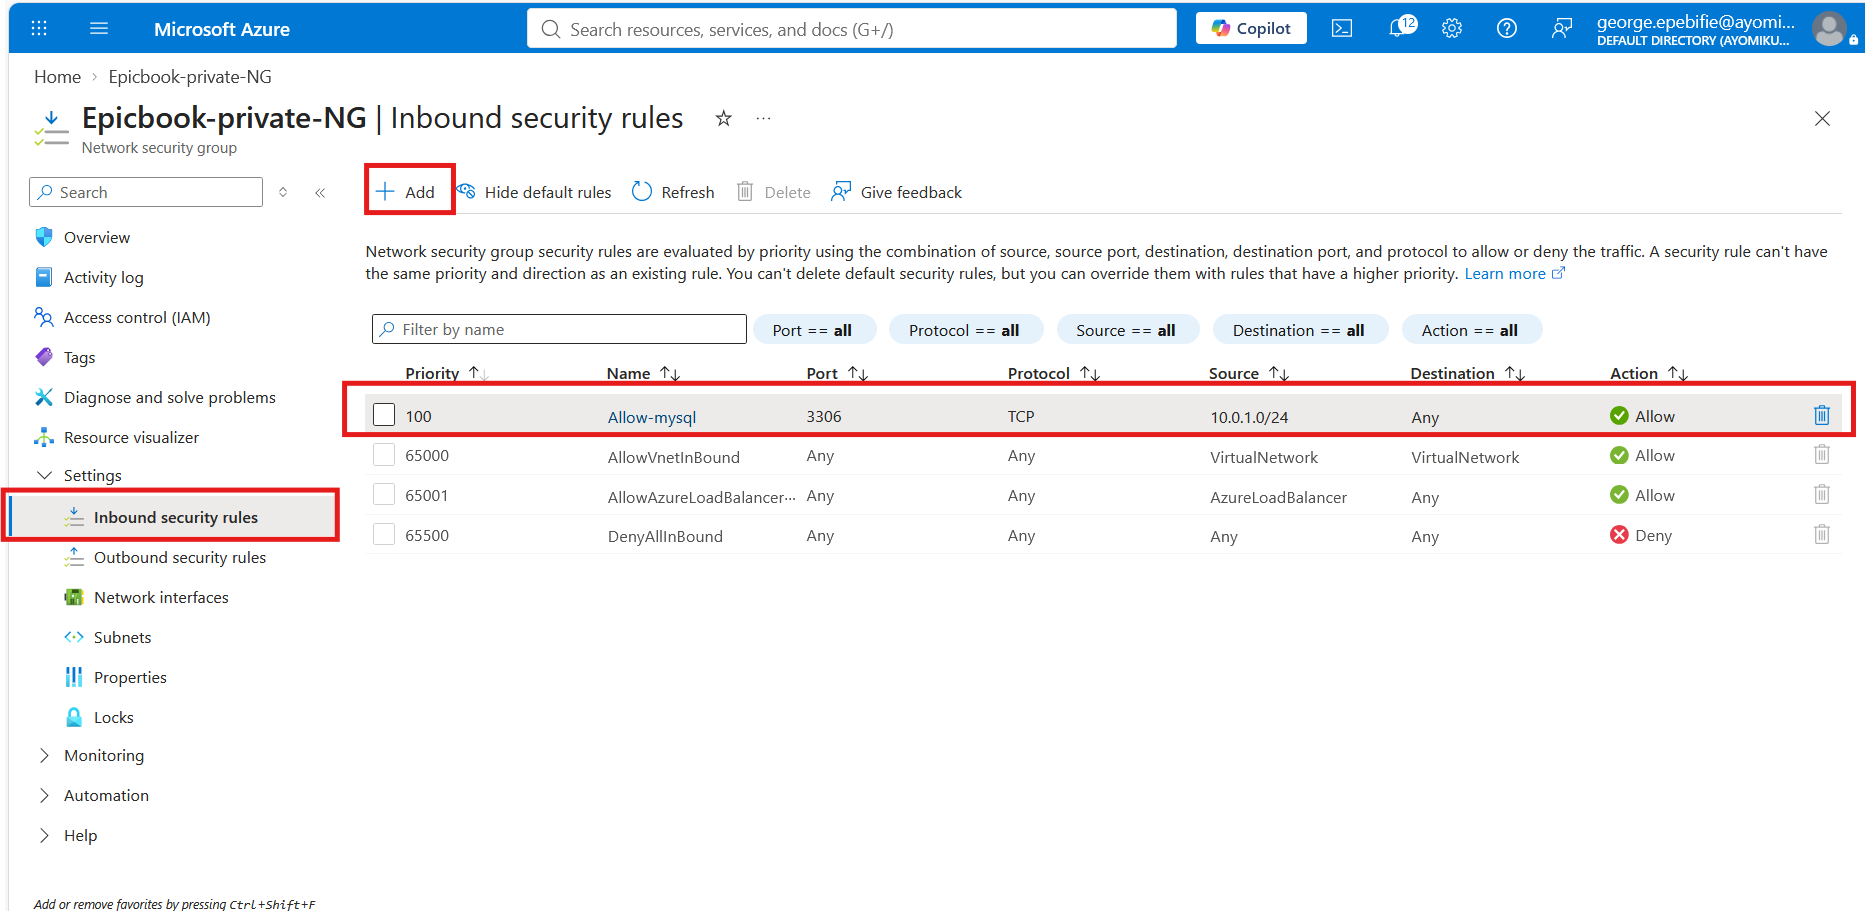
Step 1.8: Secure the Private MySQL Subnet
This subnet incoming rules will be set as follows: Source: IP Addresses, Source port: *, Destination: any, Service: MySql, Destination port: 3306, Protocol : TCP, Action: Allow, Priority: 100, Name: Allow-mysql.
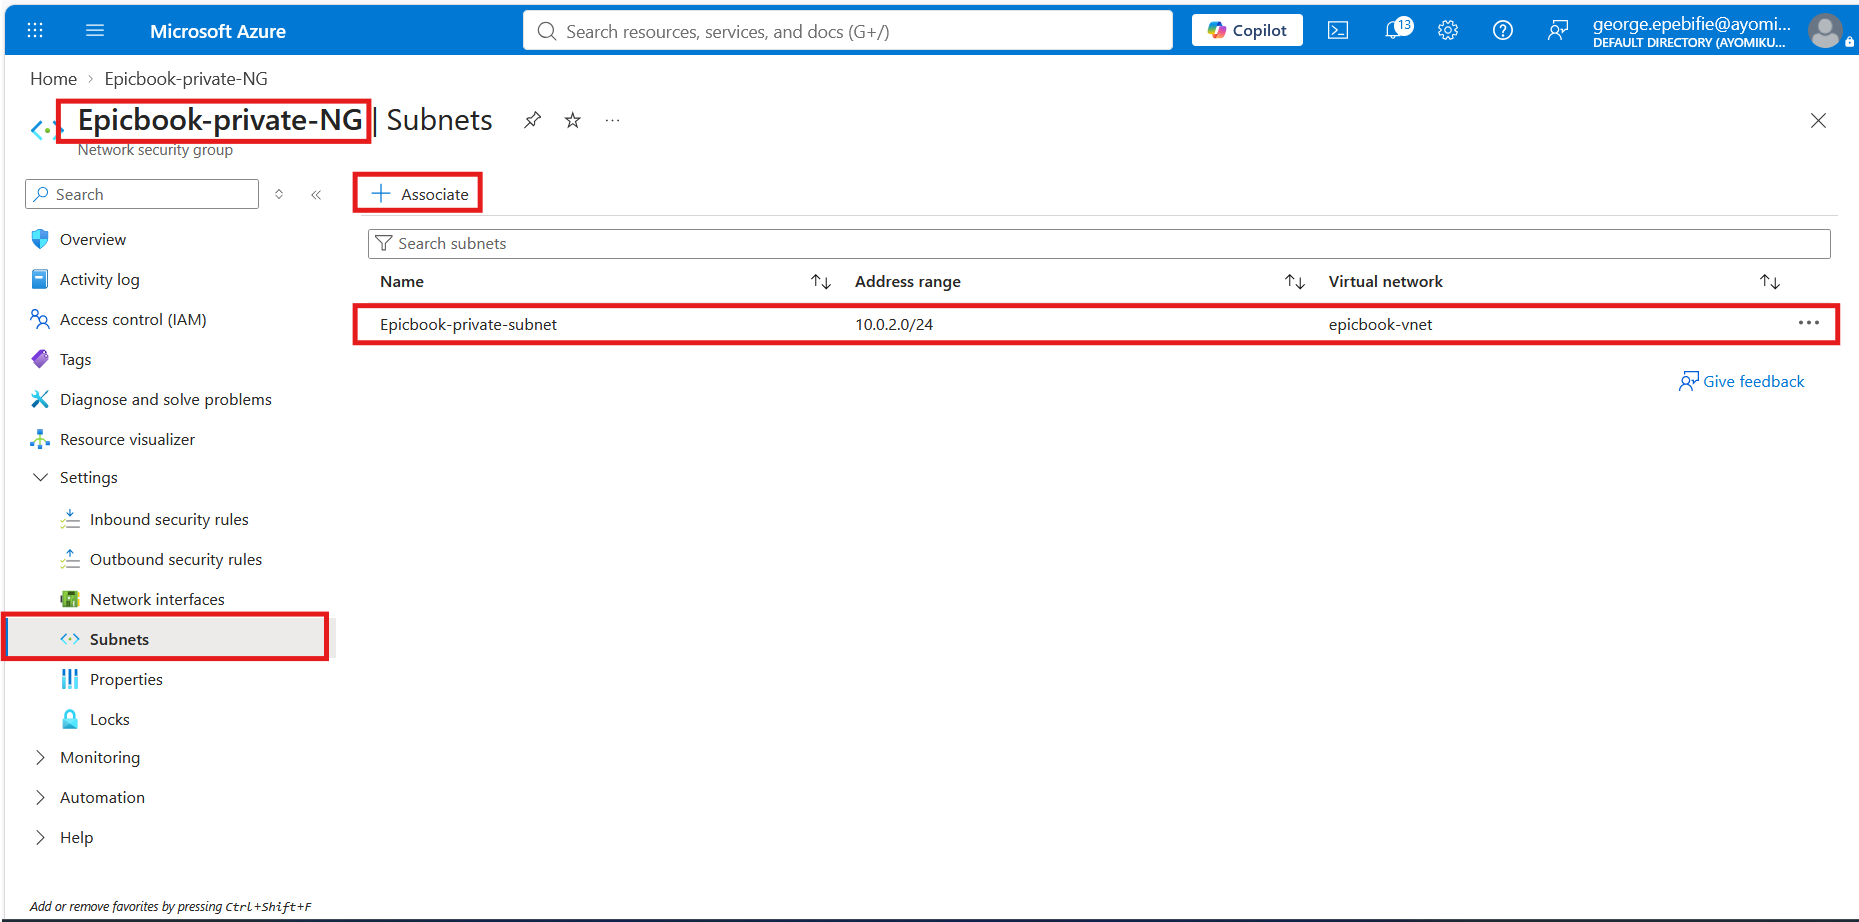
Then associate Epicbook-Private-NSG with Epicbook-private-subnet
Why this matters
Your architecture should follow the principle of least privilege:
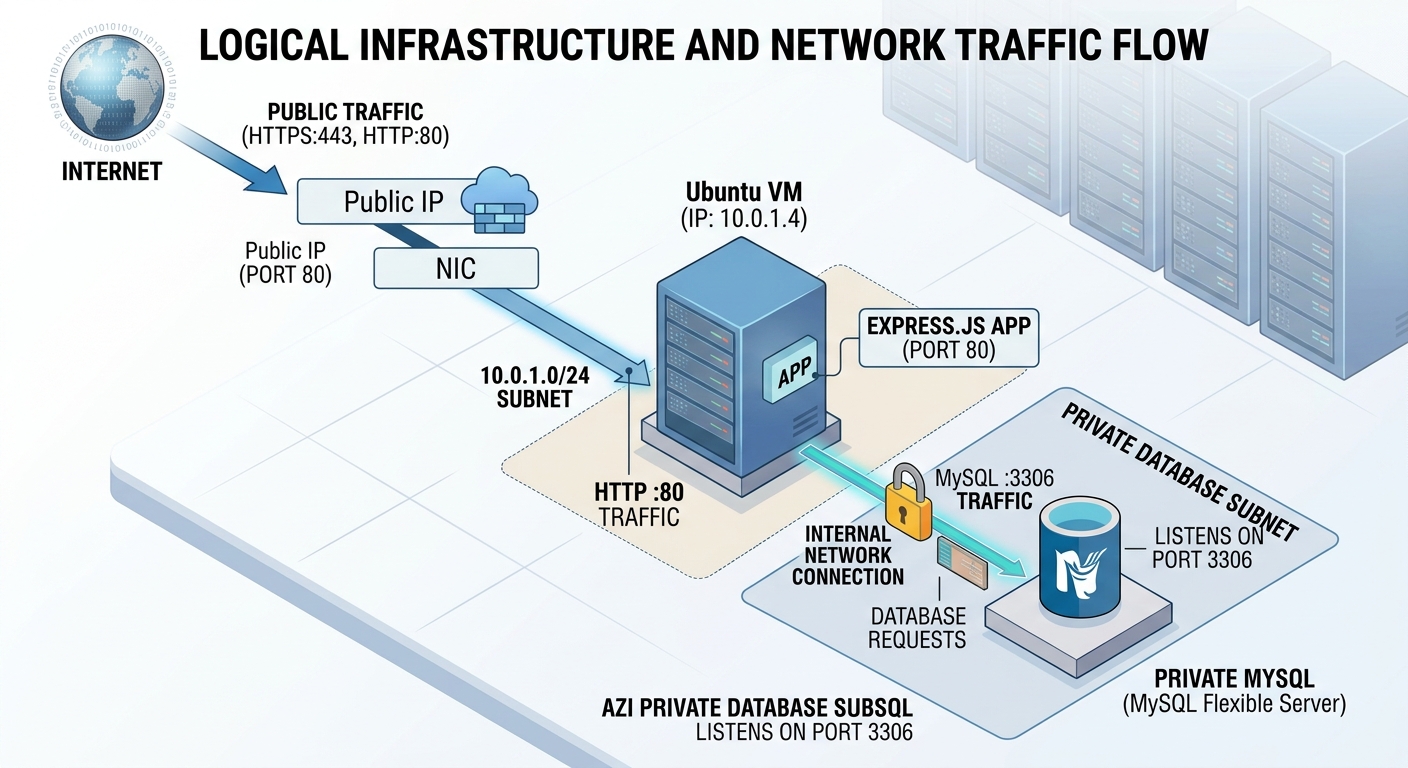
The Internet should not have a direct path to MySQL.
Step 1.9: Create the Virtual Machine's Public IP
Search for Public IP addresses, click on Public IP addresses from your search results**.** Select Create from the Public IP addresses page.
Enter the following details under the Basics tab; Subscription, Resource Group, IP Version: leave it as IPv4, SKU: Standard, Availability Zone: Zone Redundant, Tier: Regional, Routing Preference: Microsoft Network, leave all others details as default.
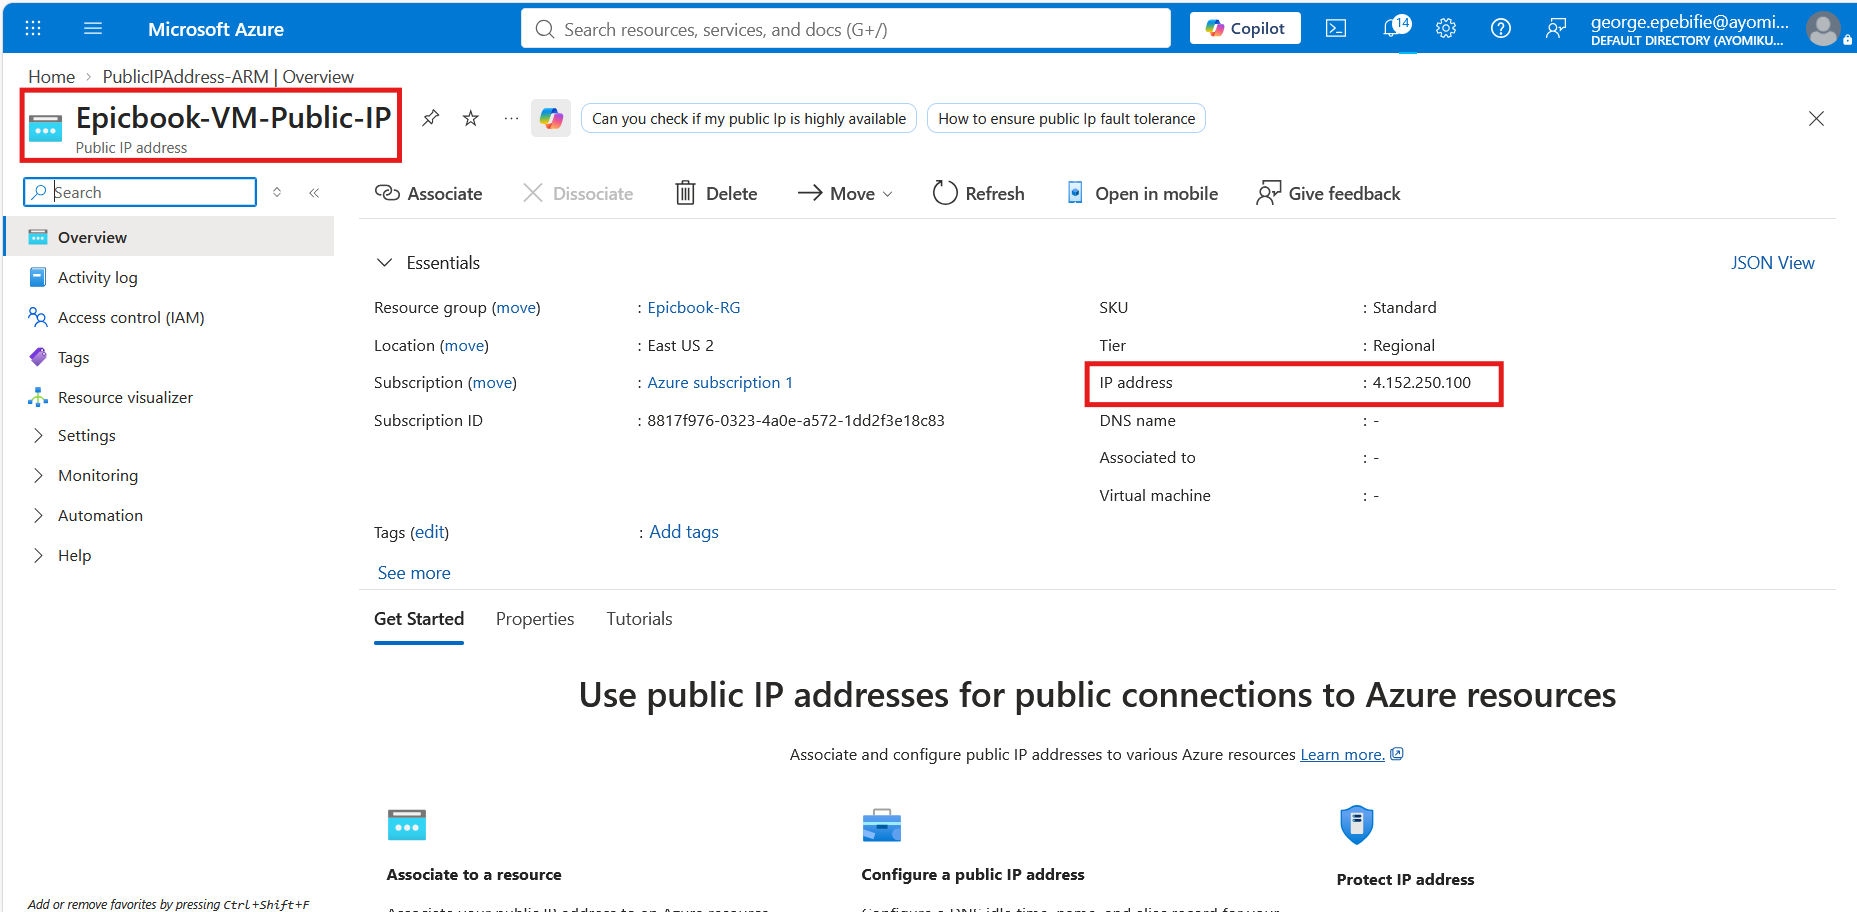
This public IP will eventually provide the application's Internet facing endpoint.
Task 2: Create the Azure Virtual Machine
Step 2.1:
to create the Virtual Machine, on the search bar at the top of the Azure search for Virtual machines.
Select: Create → Azure virtual machine
Configure the VM as follows:
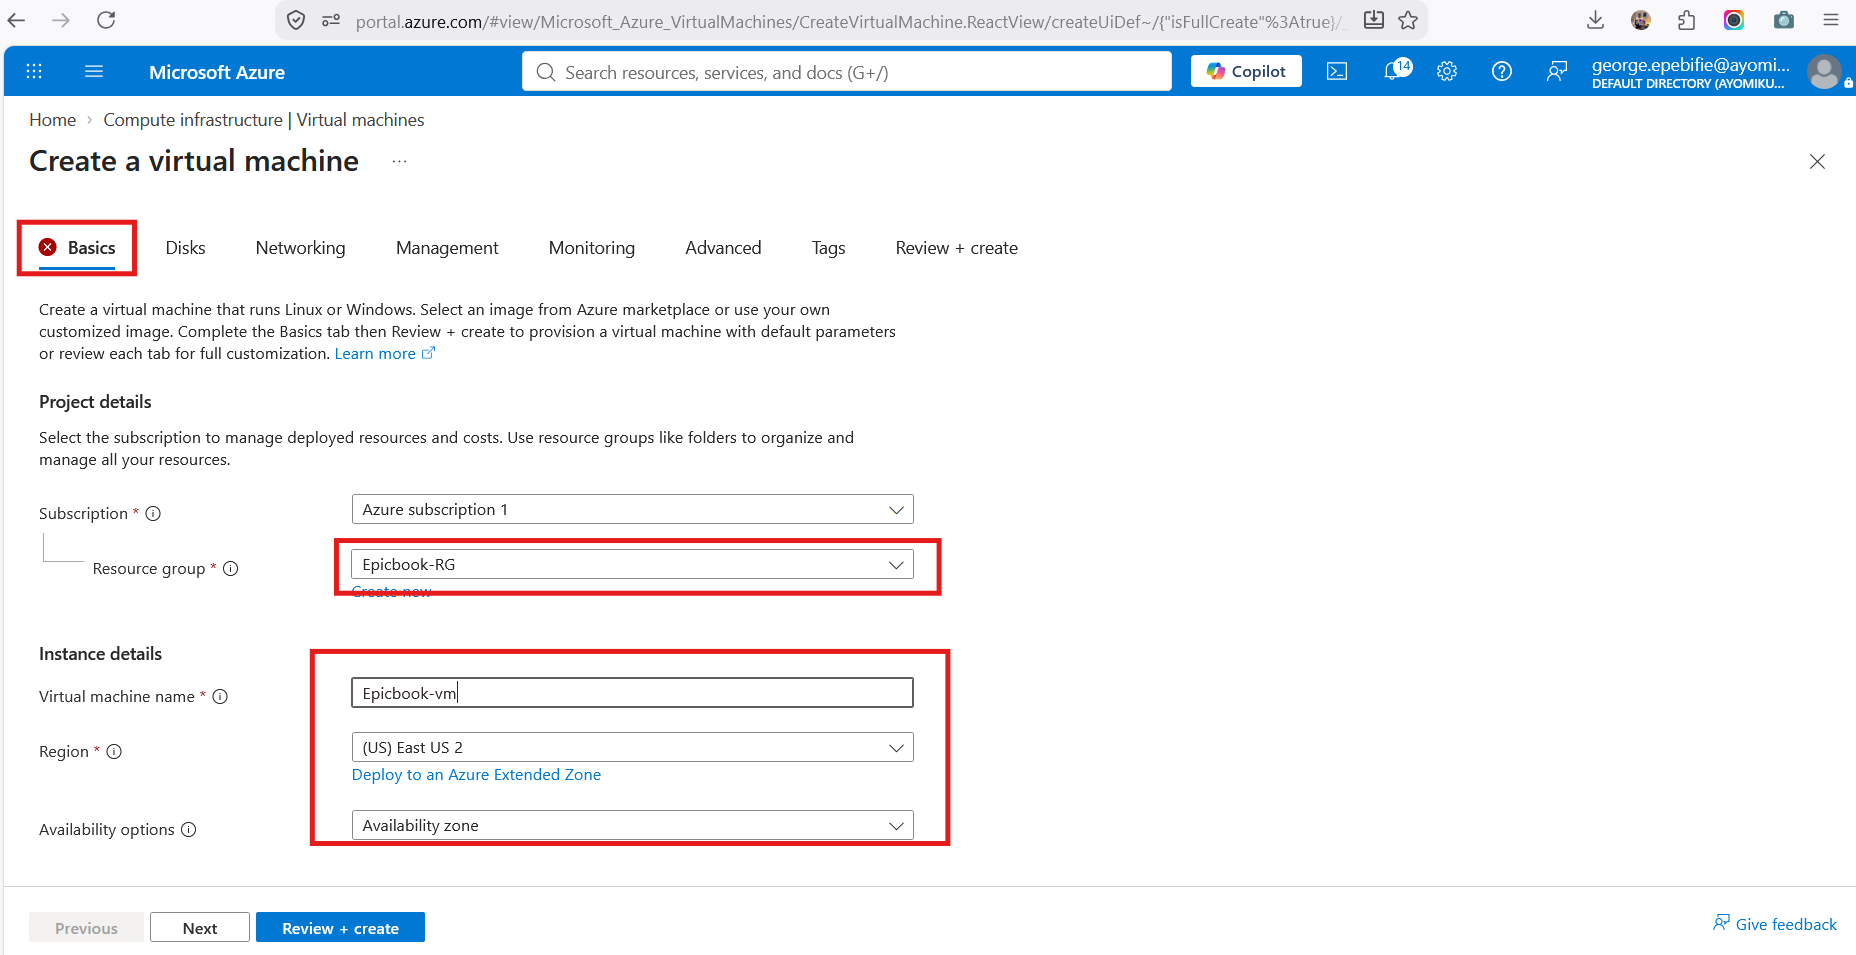
| Setting | Value |
|---|---|
| Resource group | Epicbook-RG |
| VM name | Epicbook-vm |
| Region | Same region |
| Image | Ubuntu Server 22.04 LTS |
| Size | Standard_B1s or assignment-equivalent |
The B-series is suitable for a small development/demo workload, although it may not be appropriate for a production application with sustained CPU usage.
Step 2.2: Configure SSH Authentication
Under authentication:
Select SSH public key
Create a new SSH key or select an existing one
Specify your administrator username
Download/save the private key securely
For example:
epicbook-key.pem
Protect the private key:
chmod 600 epicbook-key.pem
Never commit the private key to Git.
Step 2.3: Configure Virtual Machine Networking Configure:
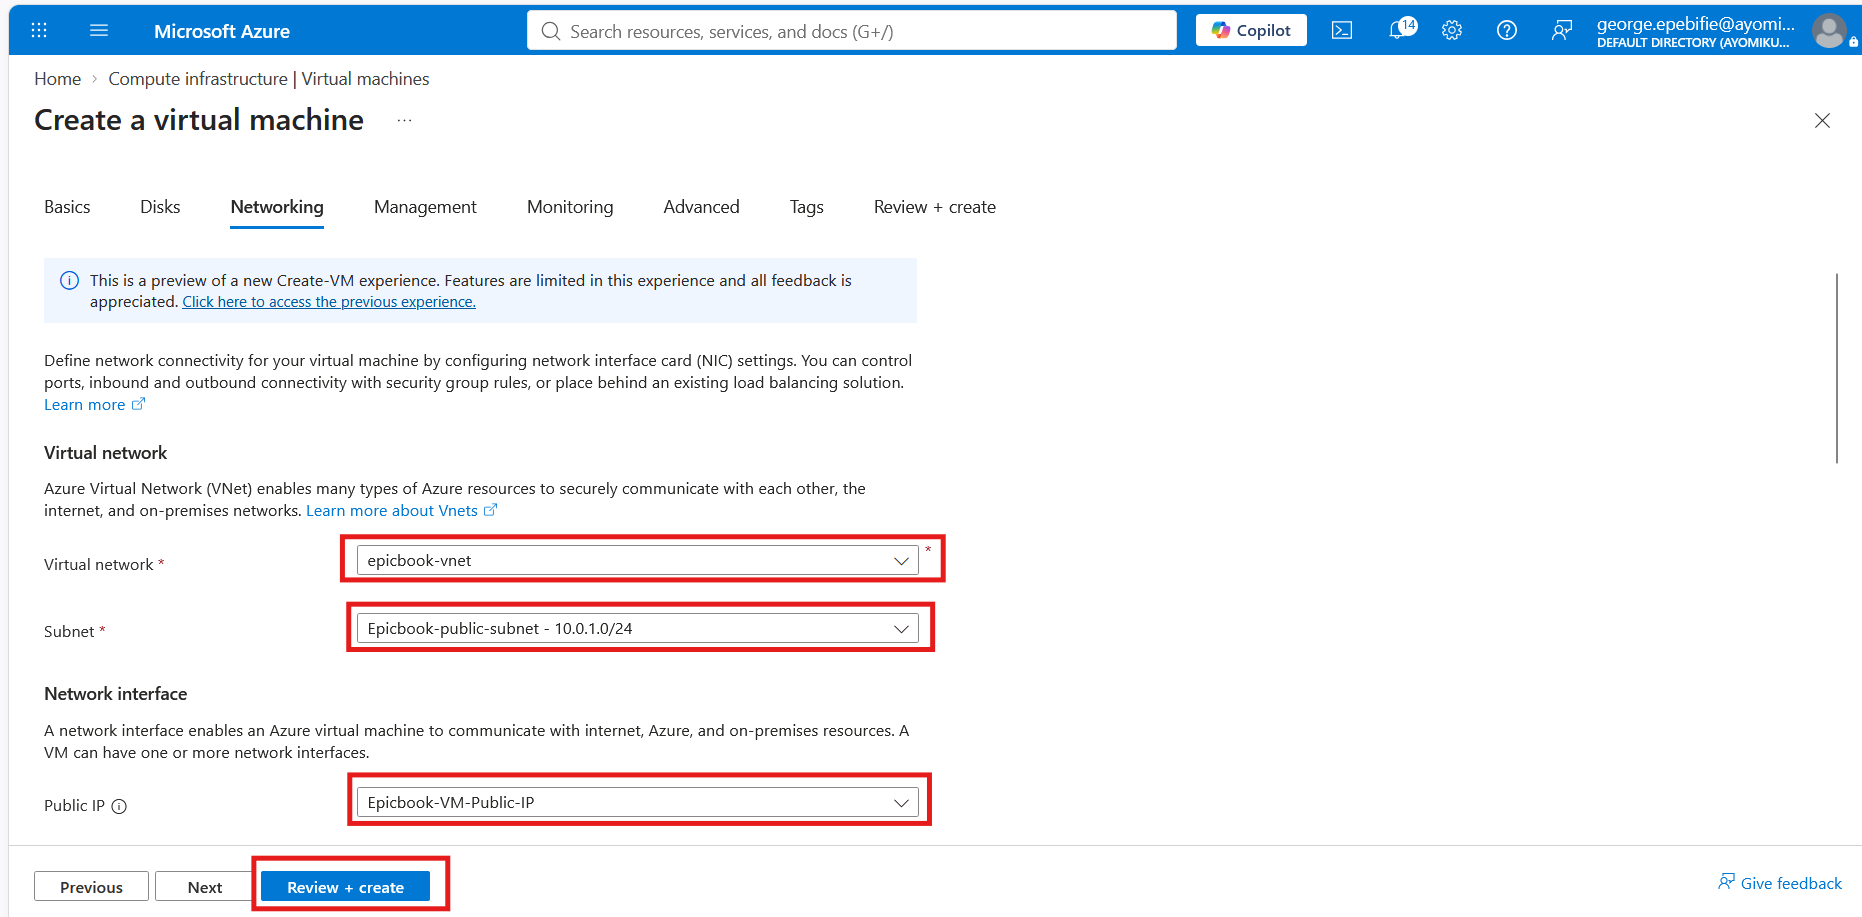
| Setting | Value |
|---|---|
| Virtual network | Epicbook-Vnet |
| Subnet | Epicbook-public-subnet |
| Public IP | Epicbook-VM-Public-IP |
| NIC | Automatically created |
The resulting network path is:
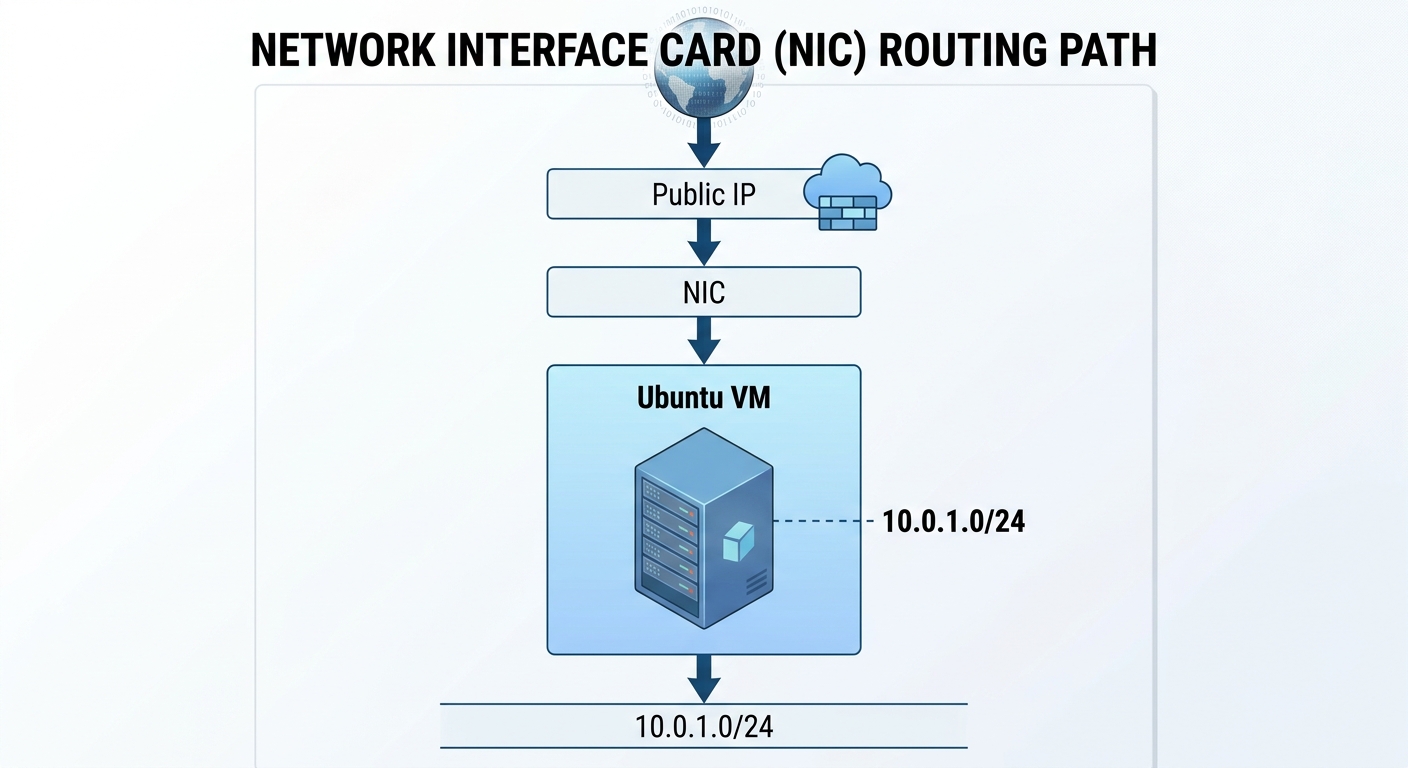
Make absolutely sure the VM is not placed in the MySQL private subnet.
Step 2.4: Deploy the Virtual Machine
Select: Review + create
After validation succeeds,
select: Create
Wait for the deployment to complete.
Step 2.5: Connect to Ubuntu
Azure will provide an SSH command.
A typical command looks like:
ssh -i your-key.pem username@<PUBLIC-IP>
For example:
ssh -i epicbook-key.pem azureuser@20.x.x.x
Once connected, verify the operating system:
lsb_release -a
You should see Ubuntu 22.04 LTS.
Step 2.6: Update Ubuntu
Update the operating system packages:
sudo apt update
sudo apt upgrade -y
Check for remaining upgrades:
apt list --upgradable
Keeping the operating system updated reduces exposure to known vulnerabilities.
Step 2.7: Install Node.js, Nginx, Git, and MySQL Client
Install Node.js 22:
curl -fsSL https://deb.nodesource.com/setup_22.x | sudo -E bash -
sudo apt install nodejs -y
Install Nginx:
sudo apt install nginx -y
Install Git:
sudo apt install git -y
Install the MySQL client:
sudo apt install mysql-client -y
Verify everything:
node -v
npm -v
nginx -v
git --version
mysql --version
Step 2.8: Enable Nginx
Run:
sudo systemctl enable nginx
sudo systemctl start nginx
sudo systemctl status nginx --no-pager
At this point, Nginx should be running.
You can initially test it by opening the VM's IP address:
http://<VM-PUBLIC-IP>
You should see the default Nginx page.
Task 3: Download and Inspect EpicBook
Clone the application:
git clone https://github.com/pravinmishraaws/theepicbook.git
cd theepicbook
Install its dependencies:
npm install
You can inspect the installed packages with:
ls node_modules | wc -l
Step 3.1: Inspect the Application Configuration
Before changing anything, inspect the application:
cat package.json
cat config/config.json
cat server.js
ls db
cat "Installation & Configuration Guide.md"
This inspection is important because it prevents us from making assumptions about how the application works.
Understanding package.json
The package manifest identifies the application's dependencies and startup configuration.
EpicBook uses technologies including:
- Express
- Express Handlebars
- Sequelize
- MySQL2
This confirms that the application is a unified Express application rather than a separate React frontend and Node.js API.
The application can be started through:
node server.js
or its corresponding npm start script, depending on the repository's package.json.
Understanding config/config.json
The Sequelize configuration contains separate environments:
development
test
production
Because the deployment does not set NODE_ENV, the application will use the development configuration by default.
The original configuration points to a local MySQL database:
127.0.0.1
That will not work because our database is hosted in Azure.
We therefore need to replace the development database configuration with the Azure MySQL server details.
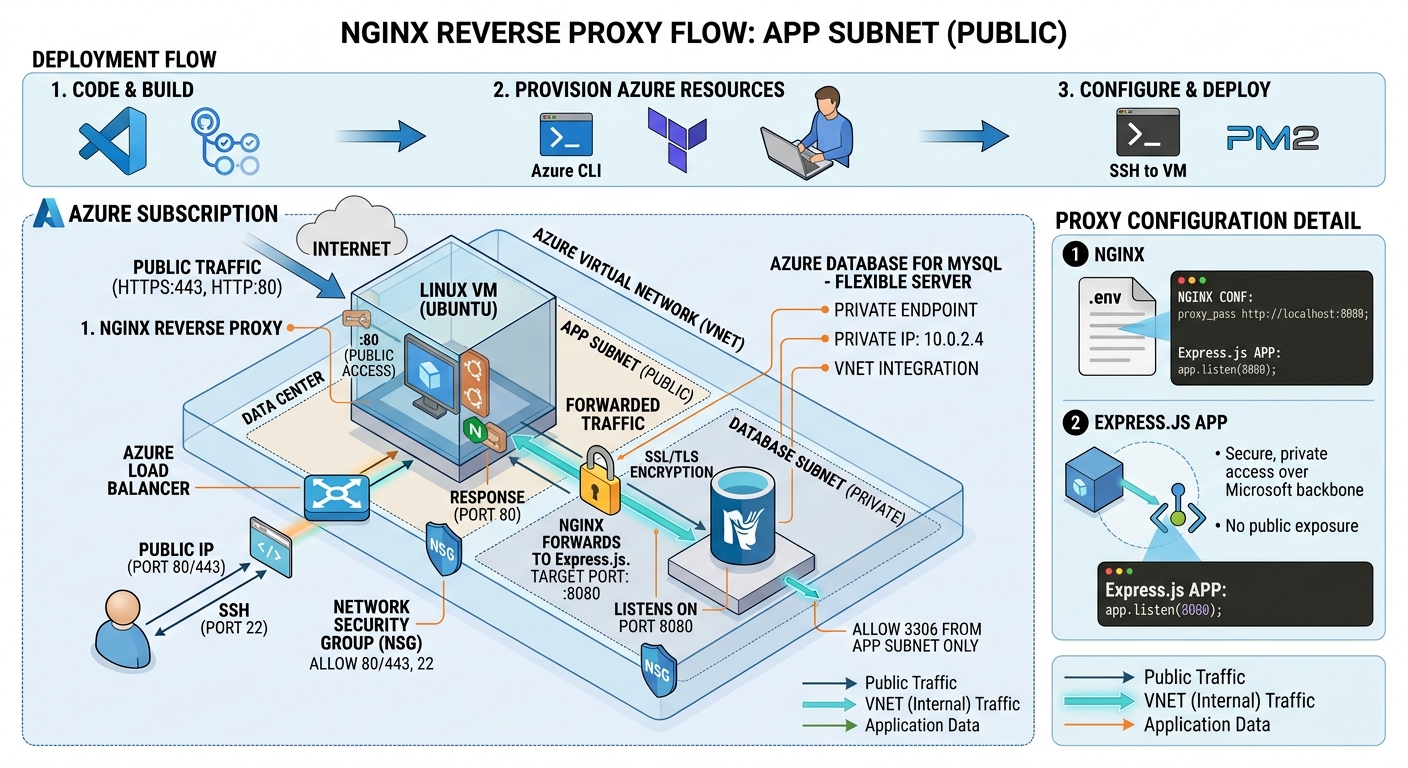
Understanding server.js
The server listens on:
8080
because the application uses:
process.env.PORT || 8080
The application also serves static files itself.
Therefore Nginx does not need to serve a React build directory.
Instead:
The application also calls Sequelize synchronization during startup.
This is important because the application will only begin accepting requests after the database initialization succeeds.
Understanding the db Directory
Inspect:
ls db
You should find files such as:
BuyTheBook_Schema.sql
author_seed.sql
books_seed.sql
author.csv
books.csv
There is an important distinction between schema creation and data seeding.
sequelize.sync() creates database tables based on the application's Sequelize models. It does not necessarily populate those tables with the bookstore's seed data. The seed SQL files are responsible for inserting the application data.
Task 4: Create Azure Database for MySQL Flexible Server
Now that the application requirements are understood, create the managed database.
In Azure Portal, search for:
Azure Database for MySQL flexible servers
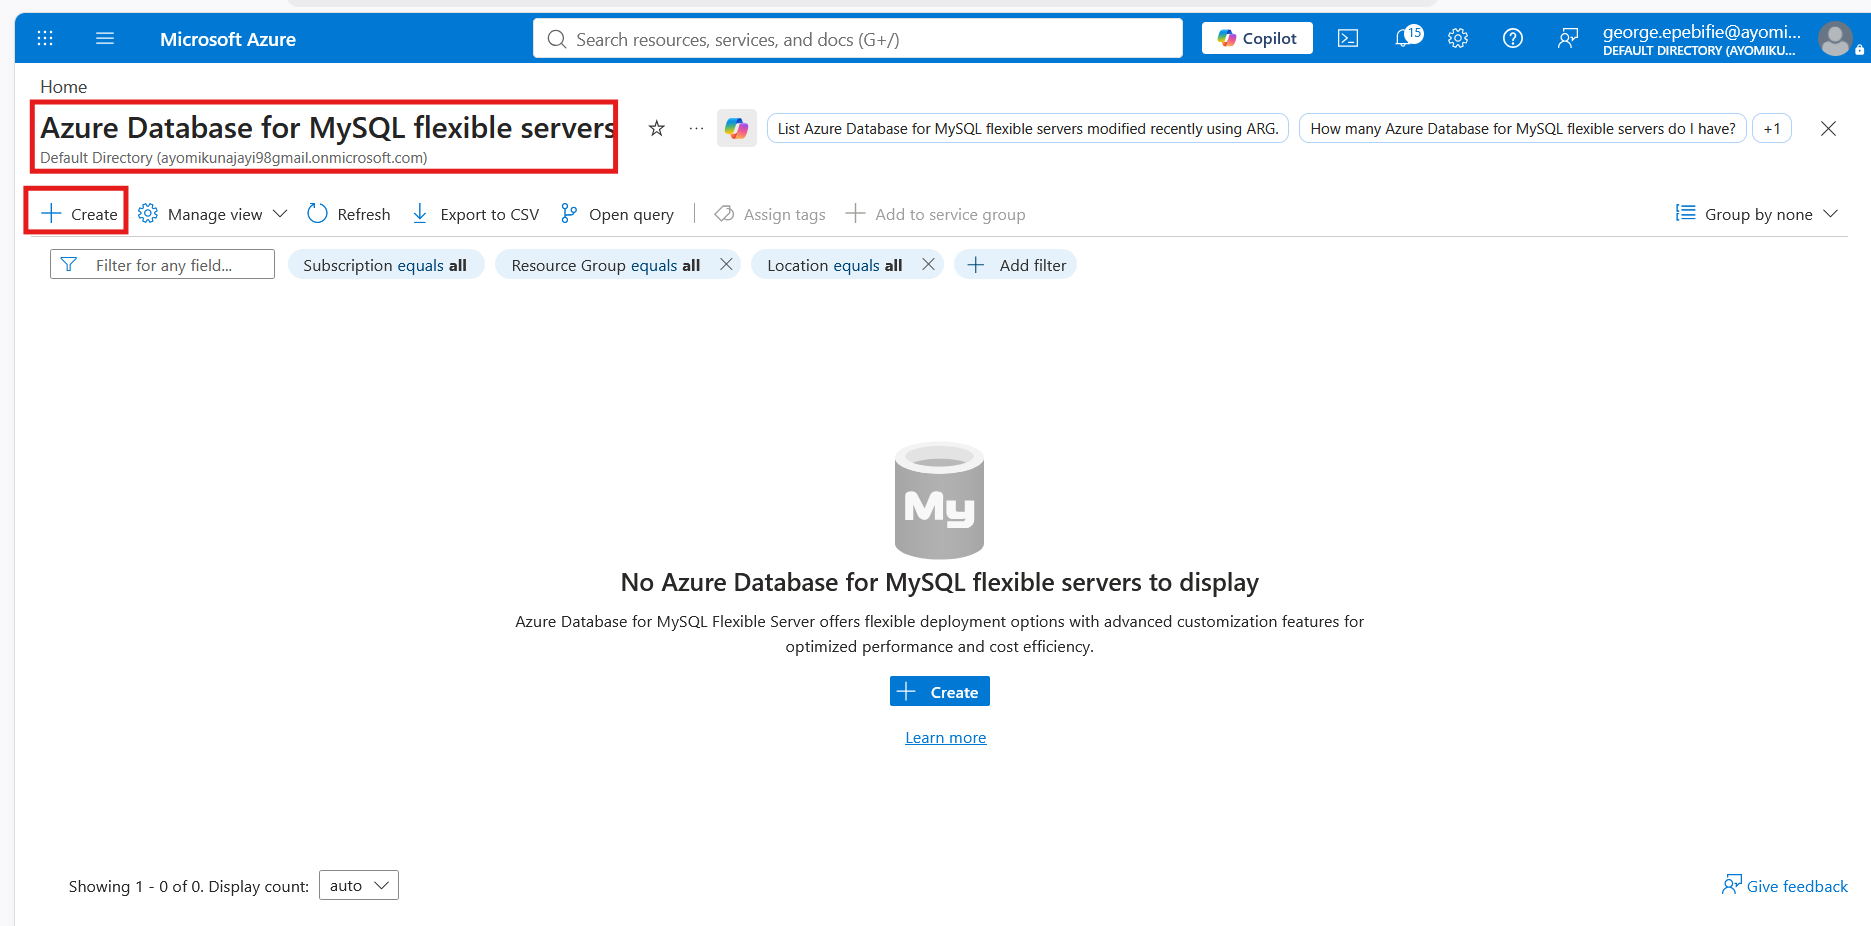
Select Create.
Choose the appropriate configuration experience offered by the portal.
Step 4.1: Configure MySQL Basics
Use:
| Setting | Value |
|---|---|
| Resource group | Epicbook-RG |
| Server name | Your globally unique server name |
| Region | Same region as VM |
| MySQL version | Current supported version |
| Workload | Development/Test |
For authentication, select:
MySQL authentication only
Choose an administrator username.
Do not attempt to use root as the Azure administrator account.
Choose a strong password and store it securely.
Step 4.2: Configure Private Networking
Select:
Private access / VNet Integration
Select:
Virtual network: Epicbook-Vnet
Select the private subnet:
Epicbook-private-subnet 10.0.2.0/24
This is what keeps the database off the public Internet.
Your architecture should now resemble:
Review the configuration and create the server. The deployment can take several minutes.
Step 4.3: Retrieve the MySQL Hostname After deployment completes,
open the MySQL Flexible Server resource. From its overview/connection information, obtain the server hostname.
For example:
epicbook-server.mysql.database.azure.com
Use your actual hostname rather than copying the example.
Task 5: Connect to MySQL from the VM
Return to the SSH session on the Ubuntu VM.
Use the MySQL client:
mysql -h epicbook-server.mysql.database.azure.com -u <ADMIN_USERNAME> -p
If the bookstore database already exists, you can connect directly:
mysql -h epicbook-server.mysql.database.azure.com -u <ADMIN_USERNAME> -p bookstore
Once connected:
SHOW DATABASES;
Then:
SHOW TABLES;
If the database has just been created and does not exist yet, create it:
CREATE DATABASE bookstore;
then:
USE bookstore;
Task 6: Configure EpicBook to Use Azure MySQL
Navigate back to the application:
cd ~/theepicbook
Open the Sequelize configuration:
nano config/config.json
Update the development section with your actual Azure MySQL credentials.
A representative configuration is:
{
  "development": {
    "username": "<MYSQL_USERNAME>",
    "password": "<MYSQL_PASSWORD>",
    "database": "bookstore",
    "host": "<MYSQL_SERVER_HOSTNAME>",
    "dialect": "mysql",
    "dialectOptions": {
      "ssl": {
        "require": true,
        "rejectUnauthorized": false
      }
    }
  },
  "test": {
    "username": "root",
    "password": null,
    "database": "database_test",
    "host": "127.0.0.1",
    "dialect": "mysql"
  },
  "production": {
    "use_env_variable": "JAWSDB_URL",
    "dialect": "mysql"
  }
}
Important security warning
Do not publish a real password in a tutorial, Git repository, screenshot, or blog post.
The example:
EpicBook2026
should be treated as a placeholder, not a password to reuse.
Also note that storing credentials directly in config.json is acceptable for demonstrating this deployment, but it is not the preferred production secret management strategy. A production deployment should use a secret management solution or environment based configuration.
Why is SSL configured?
Azure Database for MySQL requires encrypted connections in many configurations.
The Sequelize configuration therefore includes:
"dialectOptions": {
  "ssl": {
    "require": true,
    "rejectUnauthorized": false
  }
}
For production, certificate validation should be configured properly rather than simply disabling certificate verification.
Step 6.1: Validate the JSON
Before starting the application, validate the configuration file:
cat config/config.json | python3 -m json.tool
If the JSON is valid, the command will format and print it without reporting a syntax error.
This simple validation step can save considerable troubleshooting time.
Step 6.2: Start EpicBook Run:
node server.js
A successful startup should eventually show something similar to:
App listening on PORT 8080
This indicates that the application successfully completed its startup process, including the database synchronization sequence.
Step 6.3: Verify Database Tables Open a second SSH session to the VM.
Connect:
mysql -h <MYSQL_SERVER_HOSTNAME> -u <MYSQL_USERNAME> -p bookstore
Run:
SHOW TABLES;
You should now see the tables created by Sequelize. At this stage, the tables may exist but contain no bookstore records. That is expected.
Task 7: Import the EpicBook Seed Data
The application needs actual authors and books. Navigate to the database directory:
cd ~/theepicbook/db
Import the author data:
mysql -h <MYSQL_SERVER_HOSTNAME> -u <MYSQL_USERNAME> -p bookstore < author_seed.sql
Import the book data:
mysql -h <MYSQL_SERVER_HOSTNAME> -u <MYSQL_USERNAME> -p bookstore < books_seed.sql
The < operator redirects each SQL file into the MySQL client.
Step 7.1: Verify the Data Connect again:
mysql -h <MYSQL_SERVER_HOSTNAME> -u <MYSQL_USERNAME> -p bookstore
Check the author count:
SELECT COUNT(*) FROM author;
Expected result from the supplied seed data:
53
Check the book count:
SELECT COUNT(*) FROM book;
Expected:
54
Inspect sample records:
SELECT * FROM author LIMIT 5;
and:
SELECT * FROM book LIMIT 5;
The important point is that:
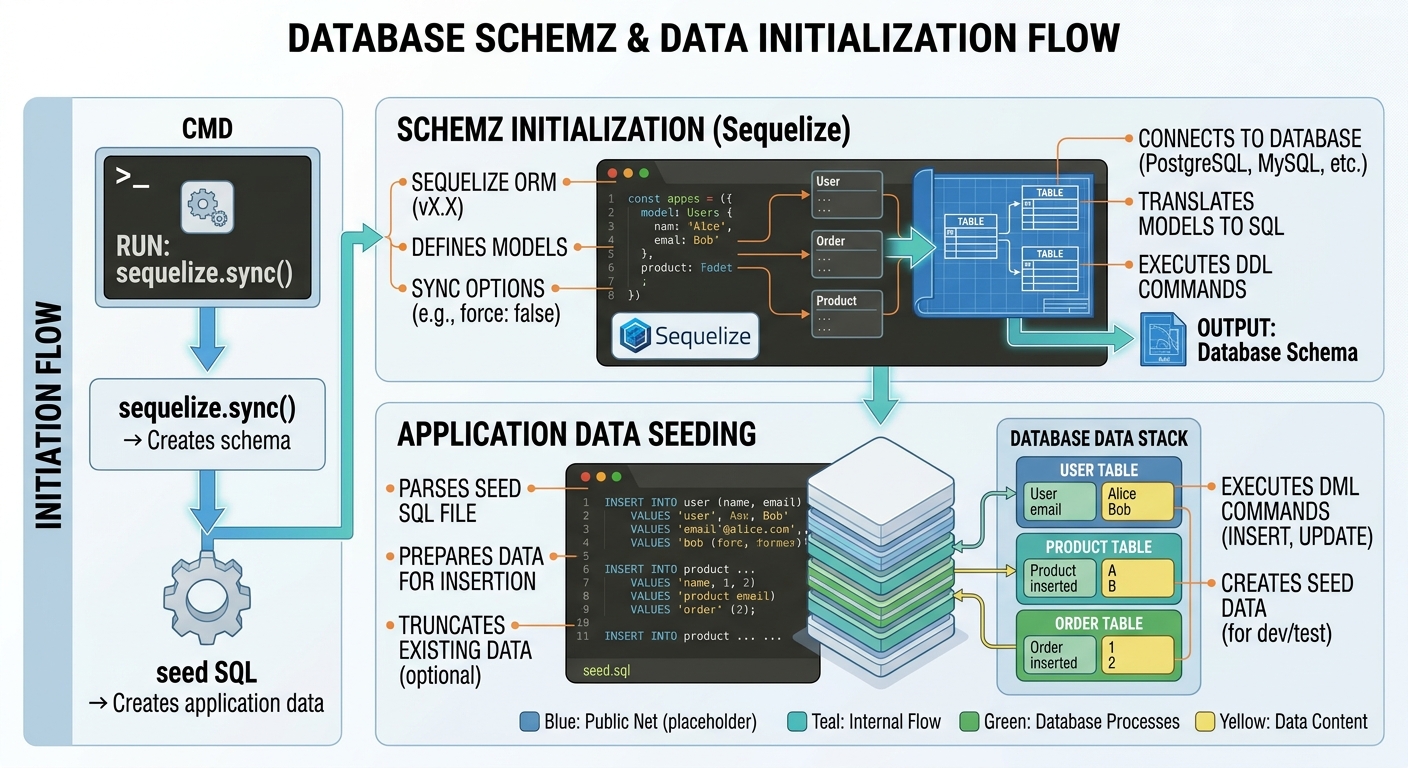
These are two separate operations.
Task 8: Test the Application Directly
Before putting Nginx in front of the application, test Express itself.
From the VM:
curl http://localhost:8080
If the application is running correctly, you should receive an HTTP response.
You can also check whether port 8080 is listening:
ss -lntp | grep 8080
You should see the Node.js process listening on port 8080. This is an important troubleshooting technique.
If:
curl localhost:8080
fails, the problem is with the Node.js application. If it works locally but:
http://<PUBLIC-IP>
fails, investigate Nginx, the NSG, or networking.
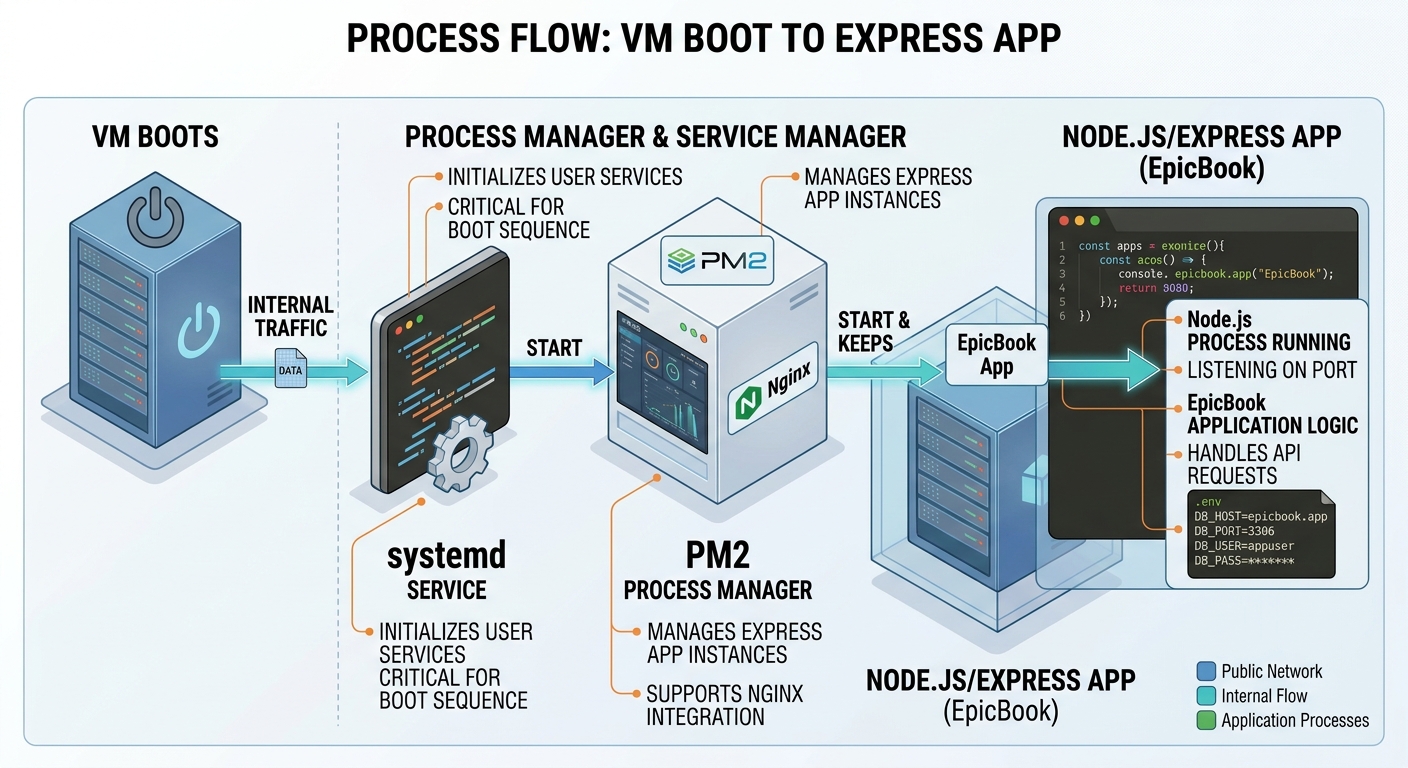
Task 9: Run EpicBook with PM2 Running:
node server.js
directly from SSH is not suitable for persistent operation. If the SSH session ends, the process can terminate.
PM2 provides process management for Node.js applications.
Install it:
sudo npm install -g pm2
Navigate to the application:
cd ~/theepicbook
Start EpicBook:
pm2 start server.js --name epicbook-app
Check the process:
pm2 status
You should see:
epicbook-app online
View logs:
pm2 logs epicbook-app
Step 9.1: Enable Startup Persistence
Save the current PM2 process list:
pm2 save
Generate the systemd startup configuration:
pm2 startup
PM2 will output a command that should be executed with sudo.
Run the command it provides. Then save the process list again:
pm2 save
Now the application can be restored after a VM reboot. The desired lifecycle is:
Task 10: Configure Nginx as a Reverse Proxy
The final component is Nginx.
The browser should not communicate directly with port 8080.
Instead:
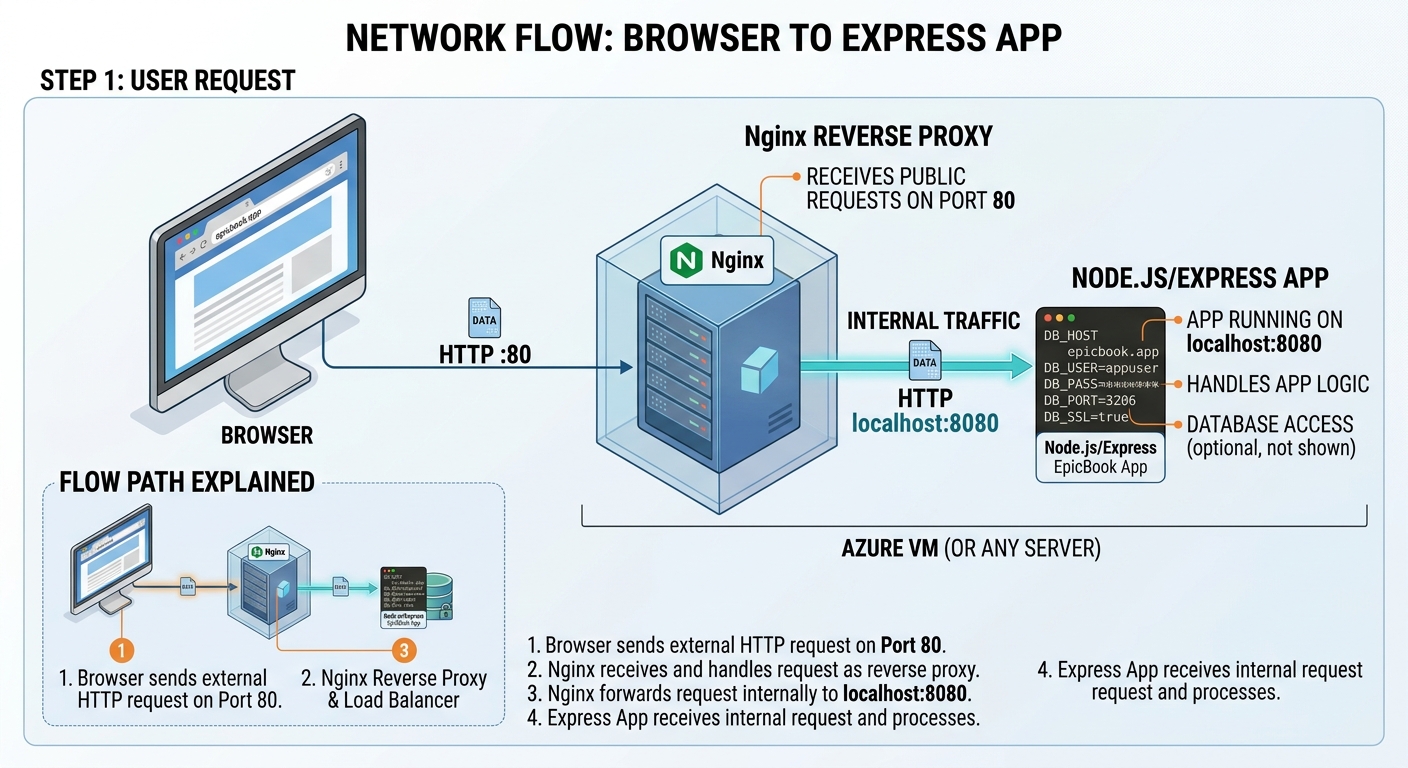
Create an Nginx configuration:
sudo nano /etc/nginx/sites-available/epicbook
Add:
server {
    listen 80;
    server_name _;

    location / {
        proxy_pass http://localhost:8080;
        proxy_http_version 1.1;

        proxy_set_header Upgrade $http_upgrade;
        proxy_set_header Connection "upgrade";

        proxy_set_header Host $host;
        proxy_cache_bypass $http_upgrade;

        proxy_set_header X-Real-IP $remote_addr;
        proxy_set_header X-Forwarded-For $proxy_add_x_forwarded_for;
        proxy_set_header X-Forwarded-Proto $scheme;
    }
}
Save the file.
Step 10.1: Enable the Nginx Site Create the symbolic link:
sudo ln -s /etc/nginx/sites-available/epicbook /etc/nginx/sites-enabled/epicbook
Remove the default site:
sudo rm -f /etc/nginx/sites-enabled/default
Test the Nginx configuration:
sudo nginx -t
You should see successful syntax validation.
Restart Nginx:
sudo systemctl restart nginx
Confirm it is running:
sudo systemctl status nginx --no-pager
Step 10.2: Access EpicBook Open a browser and navigate to:
http://
For example: http://20.x.x.x
Do not hard code an example IP from the walkthrough into your deployment. Use the actual public IP assigned to your VM.
The request flow should now be:
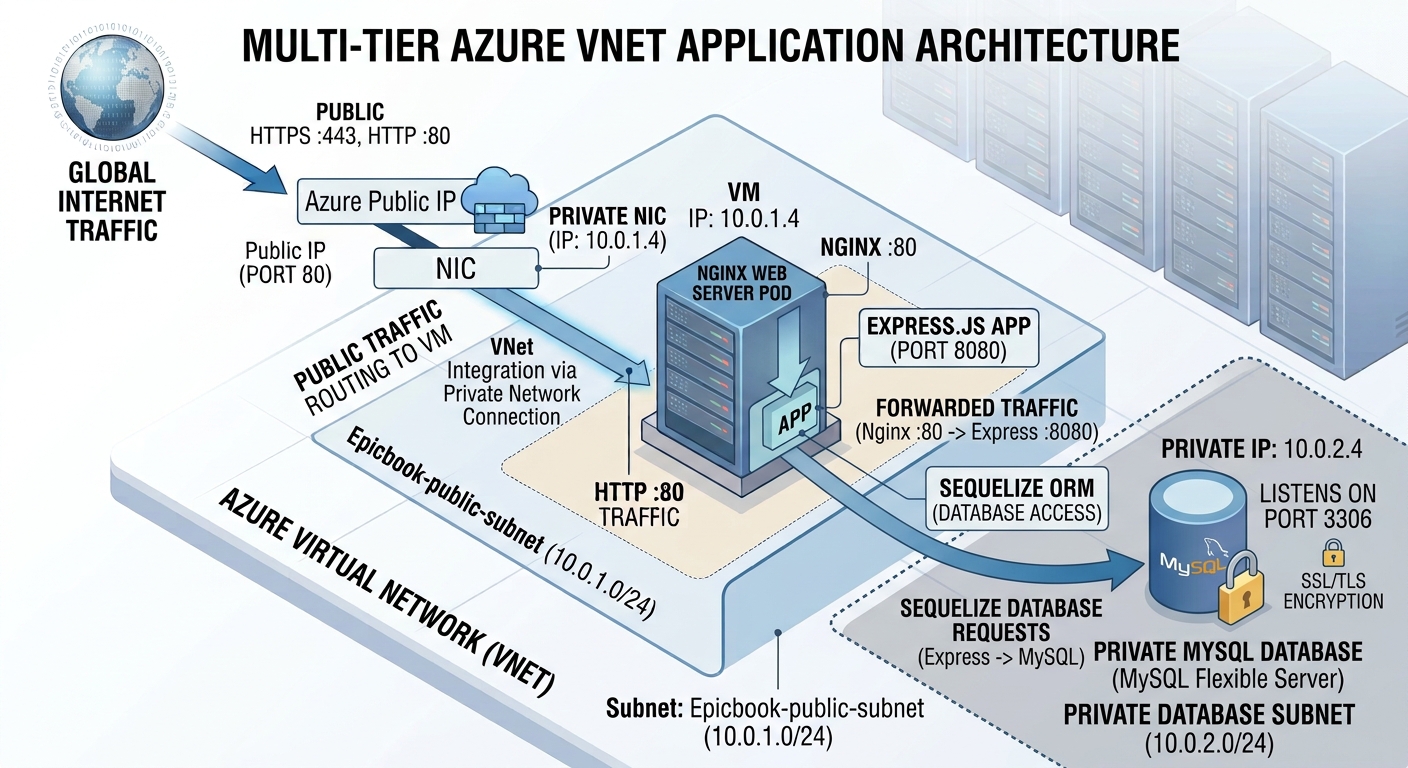
At this point, EpicBook should be accessible through the VM's public IP.
Summary
In this tutorial, we deployed EpicBook on Azure using a straightforward cloud architecture built around an Ubuntu virtual machine and a managed MySQL database.
The infrastructure was divided into two network segments:
VNet: 10.0.0.0/16

Public subnet:
10.0.1.0/24
    |
    +-- Ubuntu VM
    +-- Nginx
    +-- Node.js

Private subnet:
10.0.2.0/24
    |
    +-- Azure Database for MySQL
The VM provides the application's public entry point, while the database remains privately accessible through the Azure Virtual Network.
We also established the difference between the application's schema and its data:
Sequelize sync()
       |
       v
Database tables

Seed SQL
       |
       v
Authors + Books
Finally, PM2 keeps the Node.js application running, while Nginx acts as the public-facing reverse proxy:
Client
  |
  | HTTP
  v
Nginx :80
  |
  | proxy
  v
Node.js :8080
  |
  v
Sequelize
  |
  | private connection
  v
Azure MySQL
Conclusion
Deploying EpicBook demonstrates several fundamental cloud and DevOps principles in a practical Azure environment.
The most important lesson is that application deployment is not simply about getting a Node.js process to run. A reliable deployment requires network segmentation, controlled ingress, private database connectivity, application configuration, process management, and a properly configured reverse proxy.
The final solution keeps the public surface relatively small: Internet users interact with Nginx on the VM, while the application communicates with MySQL over the private Azure network. PM2 ensures that the Node.js process remains available after SSH disconnects and VM restarts.
There are also clear paths for future improvements. HTTPS, centralized secret management, stronger database TLS validation, restricted administrative access, monitoring, automated deployments, infrastructure as code with Terraform, and a highly available compute architecture would all move this demonstration closer to a production-grade Azure platform.
For learning Azure, Linux administration, Node.js deployment, networking, Nginx, MySQL, and DevOps fundamentals, however, this architecture provides a solid end to end example from Azure networking and compute all the way to a publicly accessible application backed by a private managed database.
P.S. This post is part of the DevOps Micro Internship (DMI) with Agentic AI — Cohort 3 — by Pravin Mishra. My graded progress is public: https://dmi.pravinmishra.com/s/wisegeorge1.html · Start your DevOps journey: https://dmi.pravinmishra.com/?utm\_source=student&utm\_medium=ps-blog&utm\_campaign=cohort3


